When Microsoft released System Center 2012 R2 Service Manager in October 2013, I was quite suprised that the server the webparts for the Self Service Portal only were supported on SharePoint 2010. At that time, installing SharePoint 2010 was only supported on Windows Server 2008 R2.
Luckely somewhere around May 2014 Microsoft released Service Pack 2 for SharePoint 2010 allowing the installation of SharePoint 2010 on top of Windows Server 2012 R2. Support statement was made in KB2724471: SharePoint 2010 support for Windows Server 2012 and Windows Server 2012 R2. And also Microsoft supports running the SharePoint Web Part on top of Windows Server 2012 R2 as stated in the Software Requirements for System Center 2012 – Service Manager. Installing the SharePoint web parts on SharePoint 2013 still isn’t supported, let’s hope a future update will bring this support, and that hopefully in the next version of the product we have another solution which is pure HTML based.
So, now that we know that we can install the Self Service Portal on a Window Server 2012 R2 server lets install the SSP on top of Windows Server 2012 R2. In this blog post I will install both the System Center 2012 R2 Service Manager Web Content Server and the System Center 2012 R2 Service Manager SharePoint Web Parts Server on the same server.
The installation consists of the following steps details below:
Step 1: Prerequisite installation
Step 1a: Installing Windows features using PowerShell
Step 1b: Installing additional prerequisite software
Step 2: Installation SharePoint 2010 Foundation
Step 2a: Install the update for SharePoint 2010 (KB3017815)
Step 3: Configure the default IIS website to use port 8080
Step 3a: Move the SharePoint website to another port
Step 4 : Install the Web Content Server and the SharePoint Web Parts Server
Step 4a: Install the latest CU for Service Manager on the SSP server
Step 1: Prerequisite installation:
When looking at the prerequisites needed we see the following described in the installation documentation for Service Manager 2012 R2.
System Center 2012 R2 Service Manager Web Content Server
- Microsoft Internet Information Services (IIS) 7 with IIS 6 metabase compatibility installed.
- A Secure Sockets Layer (SSL) certificate can be used on the IIS server that hosts the Self-Service Portal.
- For Service Manager in System Center 2012 SP1 and System Center 2012 R2 Service Manager: SQL Server 2012 Analysis Management Objects are required regardless of the SQL Server version that you use
- For System Center 2012 only: SQL Server 2008 R2 Analysis Management Objects
System Center 2012 R2 Service Manager SharePoint Web Parts Server
- Microsoft SharePoint Foundation 2010
- Microsoft SharePoint Server 2010
- Microsoft SharePoint 2010 for Internet Sites Enterprise
- If your Service Manager database uses SQL Server 2012, then you must have Service Pack 1 or later applied to your SharePoint 2010 installation.
A note about the SharePoint 2010 Prerequisites:
Keep in mind though that for installing SharePoint 2010 there are some prerequisites as well. These are mentioned in the following article: Hardware and software requirements (SharePoint Foundation 2010). The only problem is that this document doesn’t mention the prerequisites for Windows Server 2012 R2. Also the preparation tool – which should take care of the prerequisite installation, included with the SharePoint foundation installation doesn’t work on Windows Server 2012 R2 and errors out.
2015-05-19 10:15:15 – Error: The tool was unable to install Application Server Role, Web Server (IIS) Role.
Based on my earlier experiences with installing the SSP on Windows Server 2012 R2 I came to the following steps to install the prereqisuites for installing the Web Content Server, the Web Parts Server and SharePoint 2010.
Step 1a: Installing Windows features using PowerShell
Make sure you have the Windows Server 2012 R2 sxs folder from the ISO available somewhere before starting the installation of the windows features using Windows PowerShell. In my case the location was:
D:\Temp\WindowsServer2012R2\sources\sxs
Start Windows PowerShell as an Admin and type the following command:
Install-WindowsFeature NET-Framework-Core, NET-HTTP-Activation, Net-Non-HTTP-Activ, AS-NET-Framework, AS-Web-Support, AS-TCP-Port-Sharing, AS-HTTP-Activation, AS-MSMQ-Activation, AS-TCP-Activation, AS-Named-Pipes, Web-WebServer, Web-Static-Content, Web-Default-Doc, Web-Dir-Browsing, Web-http-Errors, Web-HTTP-Redirect, Web-ASP-NET, Web-Net-Ext, Web-ASP, Web-CGI, Web-ISAPI-Ext, Web-ISAPI-Filter, Web-Includes, Web-http-Logging, Web-Log-Libraries, Web-Request-Monitor, Web-http-Tracing, Web-Basic-Auth, Web-Windows-Auth, Web-Digest-Auth, Web-Client-Auth, Web-Cert-Auth, Web-Url-Auth, Web-Filtering, Web-IP-Security, Web-Stat-Compression, Web-Dyn-Compression, Web-Mgmt-Console, Web-Scripting-Tools, Web-Mgmt-Service, Web-Mgmt-Compat, Web-Metabase, Web-WMI, Web-Lgcy-Scripting, Web-lgcy-Mgmt-Console, MSMQ-Server, WAS-Process-Model, WAS-NET-Environment, WAS-Config-APIs,Windows-Identity-Foundation -source D:\Temp\WindowsServer2012R2\sources\sxs
Note: These are the same features as you would install on Windows Server 2008 R2, with the addition of the Windows-Identity-Foundation
Step 1b: Installing additional prerequisite software:
We are going to download and install the following additonal software:
Microsoft SQL Server 2008 R2 Native Client
Microsoft Sync Framework Runtime 1.0 –
Microsoft Chart Controls for Microsoft .NET Framework
Download: http://download.microsoft.com/download/c/c/4/cc4dcac6-ea60-4868-a8e0-62a8510aa747/MSChart.exe
Microsoft Filter Pack 2.0
Microsoft SQL Server 2008 Analysis Services ADOMD.NET
Server Speech Platform Runtime
Server Speech Recognition Language en-US
Microsoft SQL Server 2008 R2 Reporting Services Add-In for SharePoint 2010 Products
Download: http://download.microsoft.com/download/1/0/F/10F1C44B-6607-41ED-9E82-DF7003BFBC40/rsSharePoint.msi
After the windows features and the additional prerequisite software is installed we can download SharePoint 2010
For this we are using the following downloads:
Microsoft SharePoint Foundation 2010
Download: https://www.microsoft.com/en-us/download/details.aspx?id=24983
Latest available Cumulative Update for SharePoint Foundation 2010 (KB3017815)
Download: https://www.microsoft.com/en-us/download/details.aspx?id=47051
Step 2: Installation SharePoint 2010 Foundation
Start the Setup of SharePoint 2010
Click on “I accept the terms of this agreement” and then Click on Continue
Click on Standalone, this will start the installation
When the installation is finished you will be presented with the screen above. Keep the option to Run the SharePoint Products Configuration Wizard now selected and click Close.
On the SharePoint Products Configuration Wizard click Next
Click Yes on the warning
Wait for the wizard to finish its configuration tasks
Click Finish on the Configuration Successfull page
Verify that the website is running by starting a browser session
Step 2a: Install the update for SharePoint 2010 (KB3017815)
Run the “wssloc2010-kb3017815-fullfile-x64-glb.exe” file on the SharePoint server and verify successfull installation
Installing the Web Content Server and the SharePoint Web Parts Server
In this example we are not going to use SSL encryption and we want to run the SSP on port 80. Before we can accomplish this we first have to move other websites running on port 80 away.
This is partly documented in the System Center Service Manager documenation:
How to Configure the Default IIS Website Port – https://technet.microsoft.com/en-us/library/hh524275.aspx. This document doesn’t cover how to move any SharePoint site running on port 80 though.
Step 3: Configure the default IIS website to use port 8080
Use the procedure as described in the How to Configure the Default IIS Website Port described above
Step 3a: Move the SharePoint website to another port
For this I used the following article as an reference: http://community.spiceworks.com/how_to/1159-changing-sharepoint-default-port-80-to-another-port-79
Basically it describes that you first extend the SharePoint site to another port and then remove the intial port which was used for the website.
1. Start SharePoint 2010 Central Administration
2. Click on Application Management under Central Administration
3. Click on Manage web applications
4. Select “SharePoint – 80” and click on Extend from the Ribbon to open the Extend Web Application to another IIS Web Site window
5. Make sure the radiobutton for Create a new IIS website is selected and keep the default option
6. Click OK to close the Extend from the Ribbon to open the Extend Web Application to another IIS Web Site window
7. Go back to Central Adminsitration > Application Management
8. Choose Configure alternate access mappings
9. Click on Edit Public URLs
10. Select an Alternate Access Mapping Collection and choose “SharePoint – 80”
11. Make sure that under Default, the website with the new port provided and that the entries under Intranet, Internet, Custom en Extranet are empty
12. Click on Save
13. Make sure SharePoint is working on the new port
14. Go to Central Administration > Application Management and select SharePoint – 80.
15. Click on Delete from the ribbon and choose Remove SharePoitn from IIS Web Site
16. Select Yes and click OK
If you followed this procedure you should now have no websites running anymore on port 80
Step 4 : Install the Web Content Server and the SharePoint Web Parts Server
Start the setup of Service Manager
Choose Service Manager web portal
Select both the Web Content Server as the SharePoint Web Parts
Provide the name and organization and select the I have read understood and agree with the terms of the license terms.
Use the default path and click Next
Review the output of the prerequisite checker, and click Next
Configure the Web Content Server on port 81 and click Next
Provide the database server, SQL server instance and select the ServiceManager database and click Next
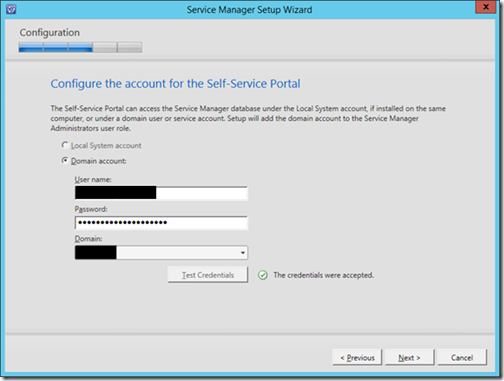
Provide the credentials of the Self-Service Portal service account, verify by clicking Test Credentials and click Next
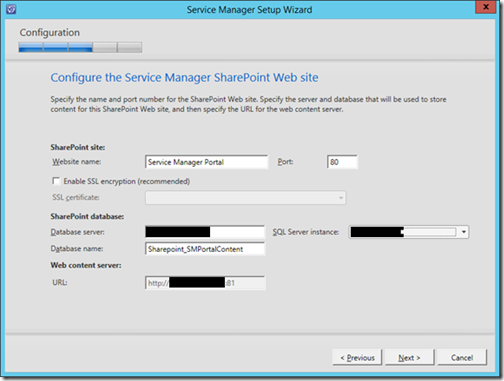
Configure the Service Manager Portal on port 80, and provide the information about where the DB should be created. Also verify the URL for the Web Content Server.
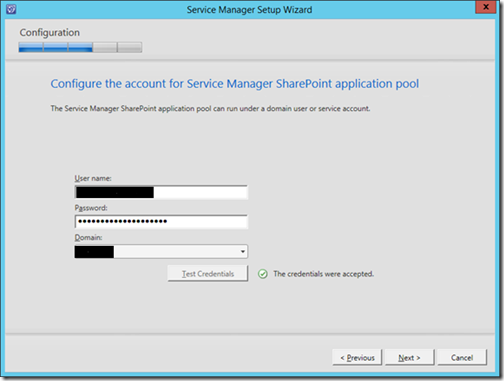
Provide the credentials of the account under which the application pool should run (I normally use the same account as for the Self-Service Portal service account), click Test Credentials and click Next
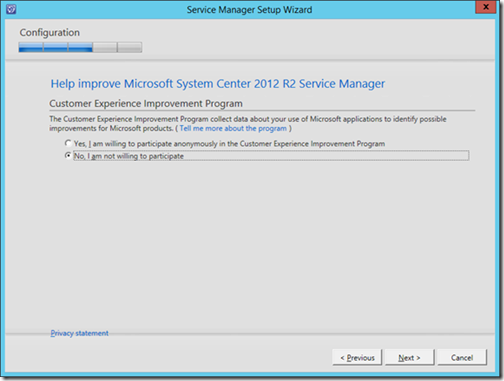
Select whether or not you want to participate in the Customer Experience Improvement Program and click Next
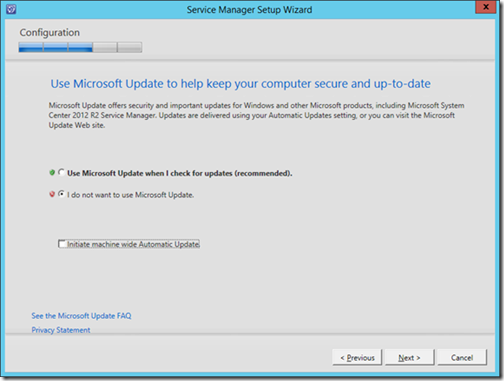
Select the “I do not want to use Microsoft Update” radio button and deselect the “initiate machine wide Automatic Update” checkbox and click Next
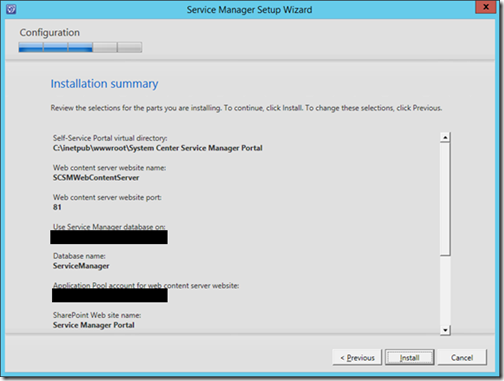
Review the information in the Installation Summary and click on Install to start the installation.
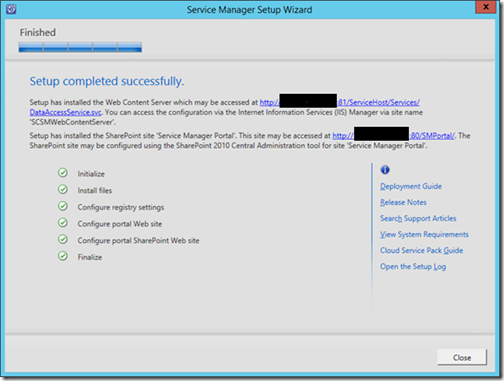
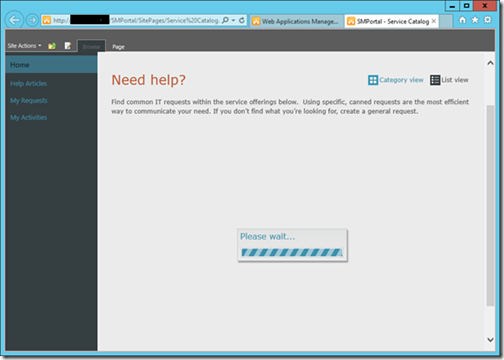
Once installation is finished, you should see the screen like the one above. Click on the link for the Service Manager Portal and verify whether you can access the portal
Step 4a: And last but not least: Do not forget to also install the latest CU for Service Manager on the SSP server after the installation is finished


Very Helpful
I know this article is from earlier this year. Is SharePoint 2013 still not supported? A vendor recently stated it was, though I am having some trouble finding more information on it.
I can answer this as far as I know no, it is not officially supported here’s a way to deploy SSP on SharePoint 2013 http://www.vansurksum.com/installing-the-service-manager-self-service-portal-ssp-on-windows-server-2012-r2/ of course this is for testing and learning purposes only.
Great article. Getting error executing custom action CreateSharePointWebSite. Articles say you need SharePoint Foundation 2010 SP1 but I’m running the SP2 slipstreamed version ??
Excellent article, great detail thanks.