
The goal of this blogpost is to explain more about what happens between the moment that a configurations setting in Microsoft Endpoint Manager (MEM) are created or modified and applied from that point forward to the endpoint. I will cover the options available to validate and monitor if the settings make it to the endpoint, and if they are applied successfully. Having this knowledge can be useful in case you need to troubleshoot or you just want to know more on what happens under the hood.
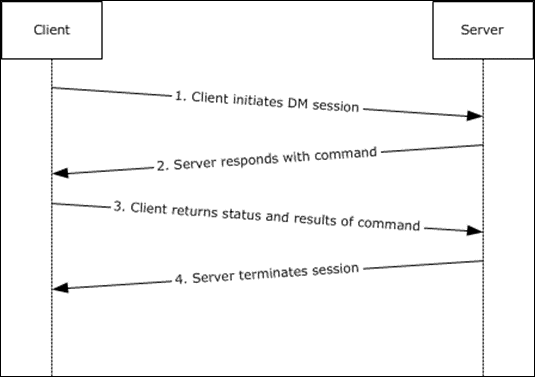
When device configuration is created in the MEM admin portal, those settings need to be assigned to either users or devices. I’ve already explained my preferences on how to do so in this article: “Designing and building your Microsoft Endpoint Manager/Intune environment for Operations“. Once the assignment has taken place and the user or the device is member of the group to which the policy is applied that user or device will receive the policy on the next policy check interval. For normal operations the policy check interval is every 8 hours. Users are able to force a policy check using either the Company Portal or by using the configured Access Work or School settings in the Control Panel. The Mobile Device Management (MDM) protocol client will take care of applying the policies to the client.
Mobile Device Management Protocol
Windows 10 has built in support for the Mobile Device Enrollment Protocol (MS-MDE), and devices rolled out using this protocol can be managed using the Mobile Device Management Protocol (MS-MDM). MS-MDM is a subset of the Open Mobile Association (OMA) Device Management Protocol (OMA-DM). If a third party MDM solution supports the protocols it can manage Windows 10 as well. It’s therefore also not needed to install a management agent on the Windows 10 device.
Windows 10, when managed through MDM can be configured using so called Configuration Service Provider (CSP) Settings which expose device configuration settings. Possible settings are added (and removed) with each new Windows 10 version Microsoft release. By using an MDM solution you are able to read, set, modify, or delete configuration settings on the device.
CSPs receive configuration policies in the XML-based Synchronization Markup Language (SyncML) format, pushed from an MDM-compliant management server, such as Microsoft Endpoint Manager/Intune. CSPs can be configured either from the Microsoft Endpoint Manager portal using the GUI when made available by Microsoft or by using the Open Mobile Alliance Uniform Resource Identifier (OMA-URI) standard. The CSP settings which are available can be found here: Configuration service provider reference
OMA-URI
If settings cannot be set in the GUI of Microsoft Endpoint Manager but are available as a CSP can be set using OMA-URI configuration. You can do this by creating a custom profile type when creating a configuration policy. It’s expected though that with the introduction of the Settings Catalog (currently in preview) all possible settings will be made available through the Settings Catalog.
Read this article if you want to know more about the Settings Catalog: A first look at the settings catalog in Microsoft Endpoint Manager.
In the end, either the setting created using a GUI option, or by specifying the OMA-URI configuration, the policy that the endpoint receive are based on the OMA-URI settings. Keep in mind that the behavior of a CSP depends on the CSP. Some CSPs remove the setting, and some CSPs keep the setting, also called tattooing.
The example for this article
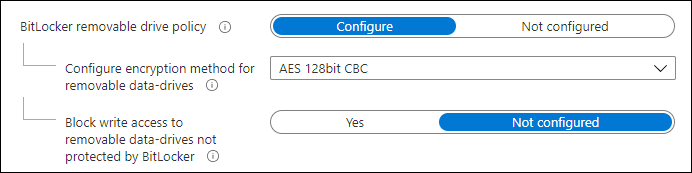
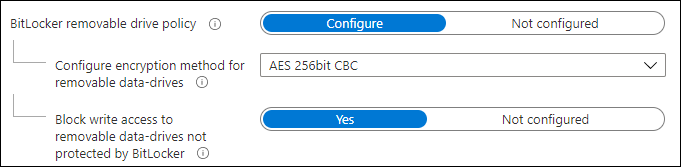
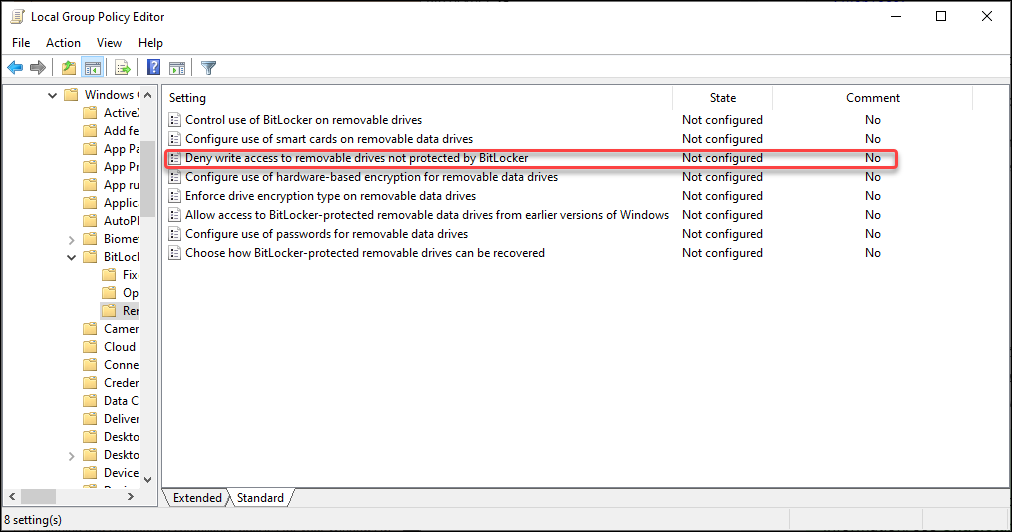
The setting we are going to modify will be applicable to the BitLocker removable drive policy. The settings we are going to modify are:
- Encryption method for removable data-drives: from AES 128 bit CBC to AES 256 bit CBC
- Block write access to removable data-drives not protected by BitLocker: from Not configured to Yes
Original settings:
Modified settings:
Translating the GUI setting to the CSP
The Encryption method for removable data-drives setting is configured using the EncryptionMethodByDriveType setting as part of the BitLocker CSP. The documentation states the following: This setting is a direct mapping to the Bitlocker Group Policy “Choose drive encryption method and cipher strength (Windows 10 [Version 1511] and later)”.
Most CSP settings are using the Group Policy method to set the settings on the endpoint, not all settings are set this way though. The example we are going to describe does.
The figure below shows the Policy setting from the Group Policy editor on the device. As you can see you can configure the encryption method for the Operating System drive, the fixed data drivers and the removable data drives.
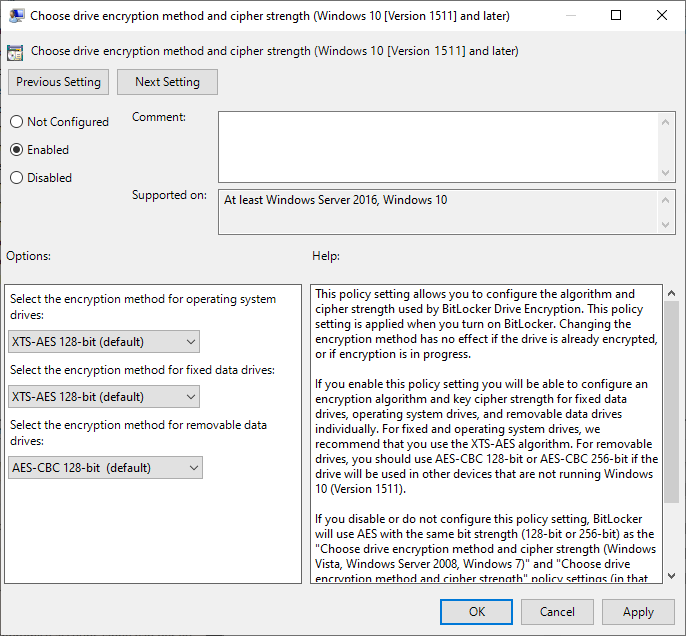
Since multiple values can be set in the same policy, the data to configure these settings using a CSP is provided in XML format. In the XML data the following configuration settings are available:
- EncryptionMethodWithXtsOsDropDown_Name = Select the encryption method for operating system drives
- EncryptionMethodWithXtsFdvDropDown_Name = Select the encryption method for fixed data drives.
- EncryptionMethodWithXtsRdvDropDown_Name = Select the encryption method for removable data drives.
Each setting has can have the following possible values:
- 3 = AES-CBC 128
- 4 = AES-CBC 256
- 6 = XTS-AES 128
- 7 = XTS-AES 256
So based on the setting made in the MEM admin portal GUI, we can translate this setting to EncryptionMethodWithXtsRdvDropDown_Name=4
So the XML for the now modified setting should look something like:
<enabled/><data id="EncryptionMethodWithXtsOsDropDown_Name" value="6"/><data id="EncryptionMethodWithXtsFdvDropDown_Name" value="6"/><data id="EncryptionMethodWithXtsRdvDropDown_Name" value="4"/>
The Block write access to removable data-drives not protected by BitLocker setting is configured using the RemovableDrivesRequireEncryption setting. Also this setting is a direct mapping to the BitLocker Group policy setting “Deny write access to removable drives not protected by BitLocker”
The configuration setting here is simply Not Configured, Enabled or Disabled. If enabled we can use the RDVCrossOrg setting to specify whether we want to allow write access to devices configured in another organization. This RDVCrossOrg setting has the following possible values:
- true = Explicitly allow
- false = Policy not set
So based on this we can translate this setting to Enabled and RDVCrossOrg=false.
The XML for the now modified setting should look like:
<enabled/><data id="RDVCrossOrg" value="false"/>
Now let’s see if we can follow the “expected” values all the way to the client.
SyncML viewer, Eventlog and Registry
We can use several tools to follow how a configuration setting created in MEM admin portal ends up on the Windows 10 client. For this we are going to make a change to a configuration setting as set in the Microsoft Defender for Endpoint baseline.
SyncML viewer
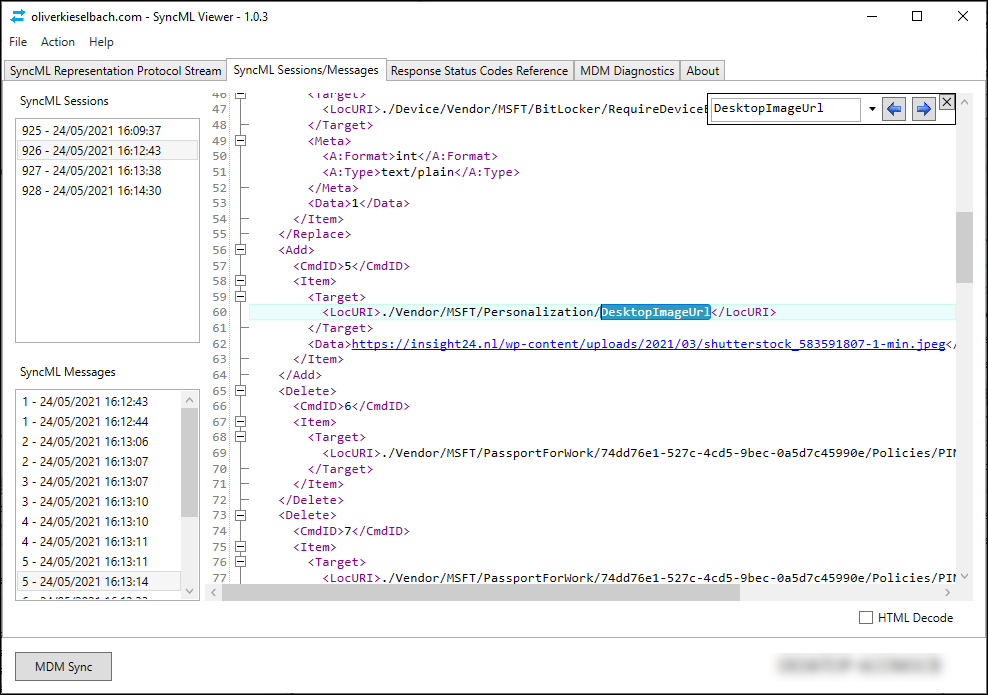
If you want to view the SyncML data which is exchanged while performing an MDM sync you can use a tool called SyncML Viewer written by Microsoft MVP Olivier Kieselbach. This tool, in my opinion must be in your MEM/Intune troubleshooting toolbox for sure. SyncML Viewer will show in real time all SyncML xml-based representation protocol information, exchanged between the Windows 10 client and the management system
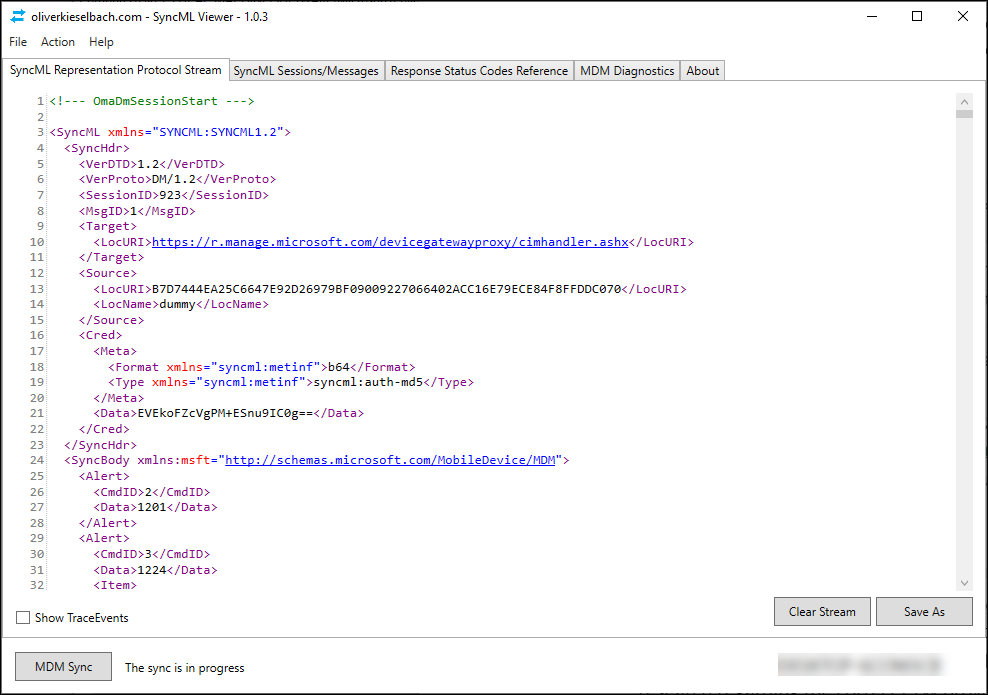
The tool allows you to force an MDM sync, and it will show you the XML data from that syncing session. During the sync several messages are exchanged, you can view each individual message on the SyncML Sessions/Messages tab.
If you want to find the setting in the SyncML message, the best thing to do is to use the search functionality provided by the tool. In my case I searched for the EncryptionMethodWithXtsRdvDropDown_Name setting which gave me the following result.
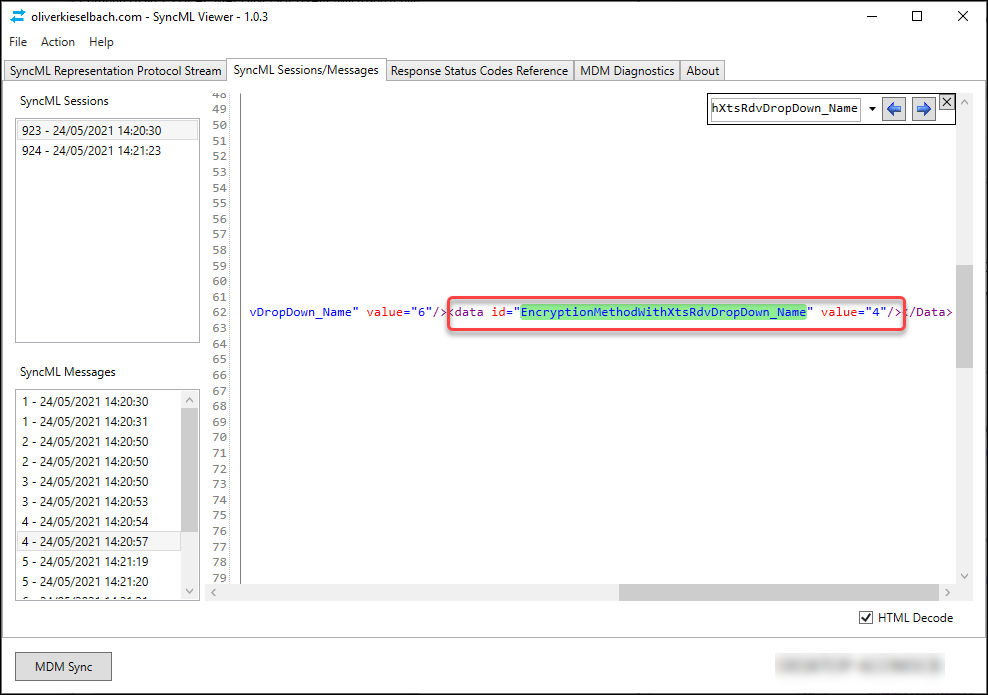
The specific XML containing the changes is below:
<Replace>
      <CmdID>5</CmdID>
      <Item>
        <Target>
          <LocURI>./Device/Vendor/MSFT/BitLocker/EncryptionMethodByDriveType</LocURI>
        </Target>
        <Data><enabled/><data id="EncryptionMethodWithXtsOsDropDown_Name" value="6"/><data id="EncryptionMethodWithXtsFdvDropDown_Name" value="6"/><data id="EncryptionMethodWithXtsRdvDropDown_Name" value="4"/></Data>
      </Item>
    </Replace>
    <Add>
      <CmdID>6</CmdID>
      <Item>
        <Target>
          <LocURI>./Device/Vendor/MSFT/BitLocker/RemovableDrivesRequireEncryption</LocURI>
        </Target>
        <Data><enabled/><data id="RDVCrossOrg" value="false"/></Data>
      </Item>
    </Add>
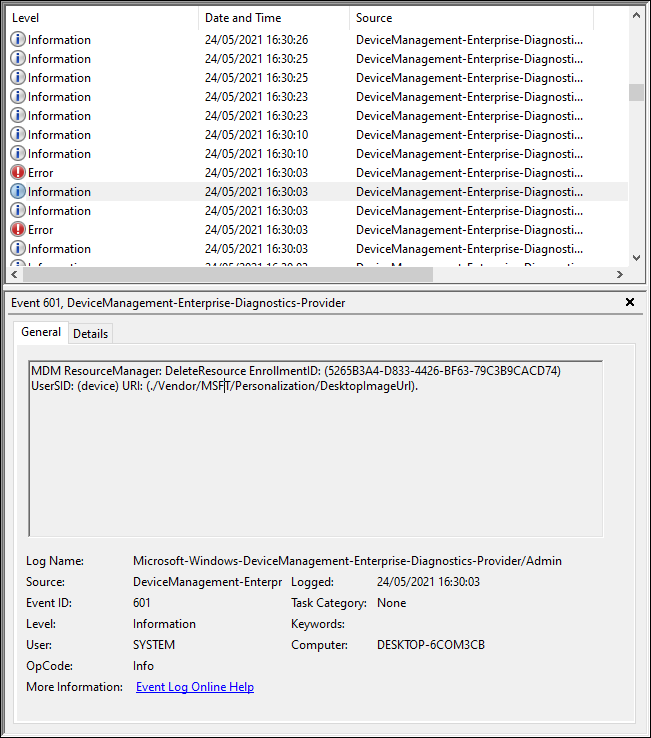
Eventlog
You can also use the Windows eventlog to show what happens when new policy arrives at the endpoint. You can find this information in the DeviceManagement-Enterprise-Diagnostics-Provider eventlog which is located under Applications and Services Logs -> Microsoft -> Windows.
For the EncryptionMethodWithXtsRdvDropDown_Name setting we can find it in the following entry.
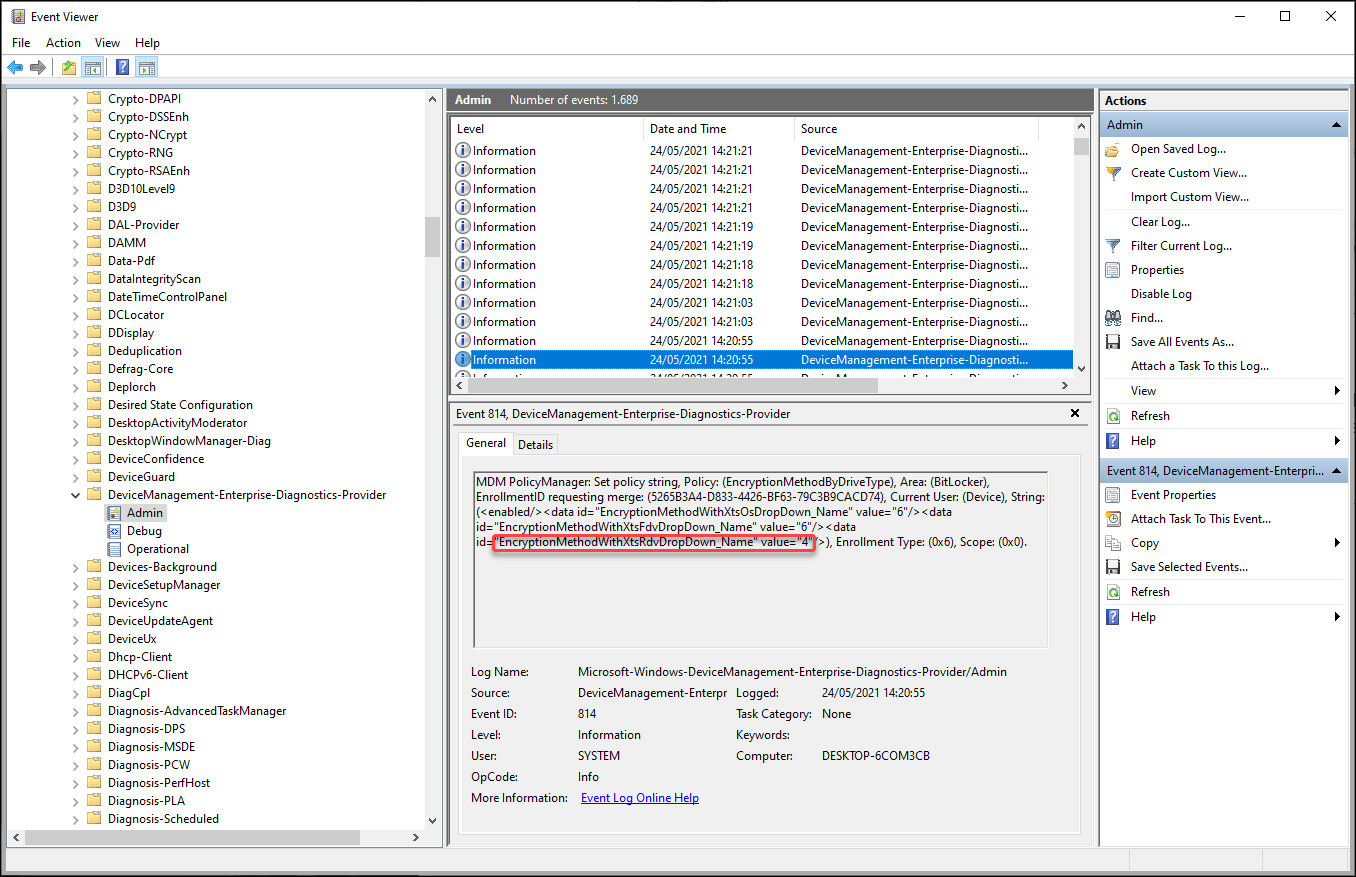
And for the RemovableDrivesRequireEncryption setting we can find it in the following entry.
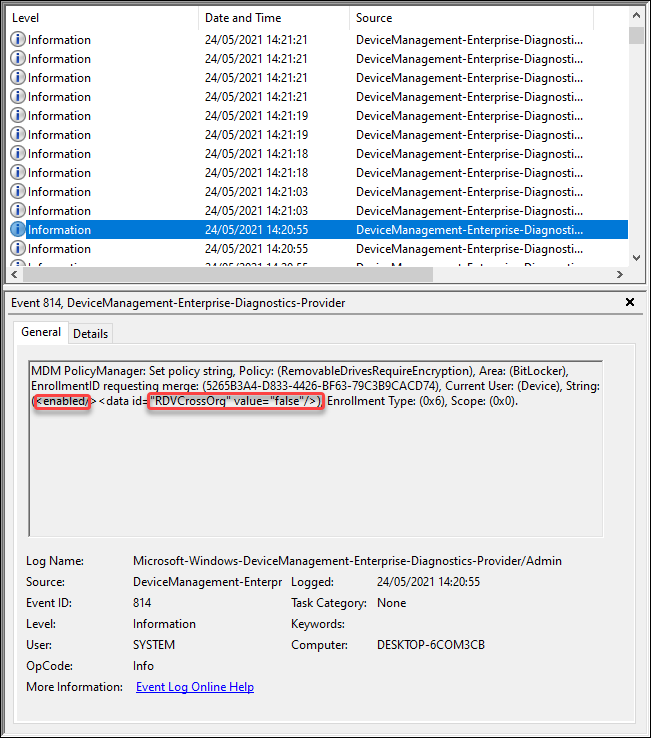
If you are doing deep dive troubleshooting it might be necessary to enable debug logging. In order to enable debug logging for the DeviceManagement-Enterprise-Diagnostics-Provider eventlog you must first enable the Show analytics and debug logs option under the view menu, and once the Debug node appears under the DeviceManagement-Enterprise-Diagnostics-Provider section you can right-click on the node and select “Enable log”
So, now that we verified that during the policy sync the new setting was in the policy we can continue with verification on the device. We can do so by using the Registry editor.
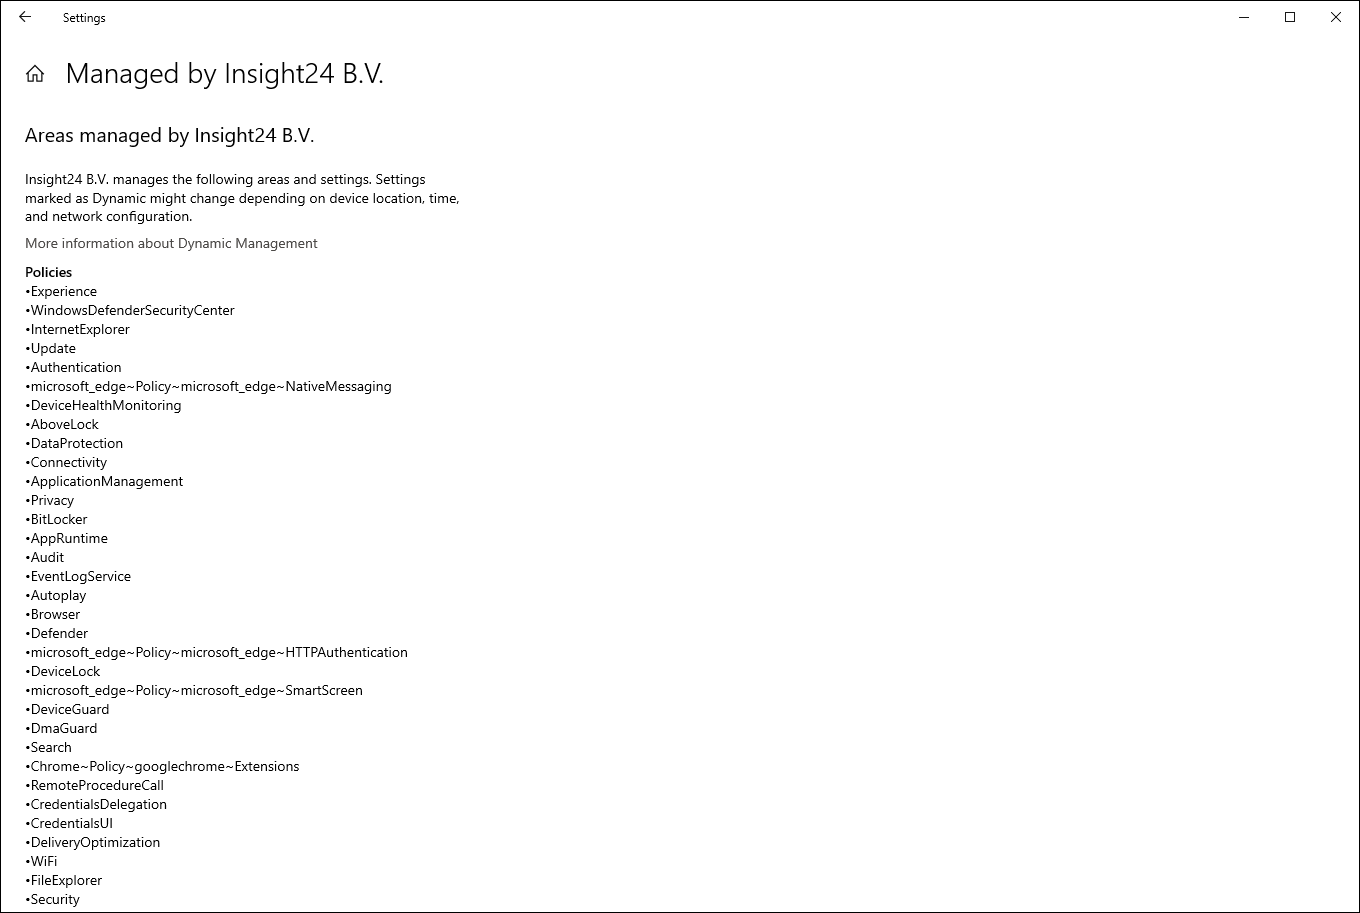
The first registry key we are going to open is the HKEY_LOCAL_MACHINE\SOFTWARE\Microsoft\PolicyManager\current\device registry key. This key contains most of the settings received from MEM/Intune (via ADMX ingestion). The subkeys under this registry key contains the same information that you see when opening the “Access work or school” control panel section.
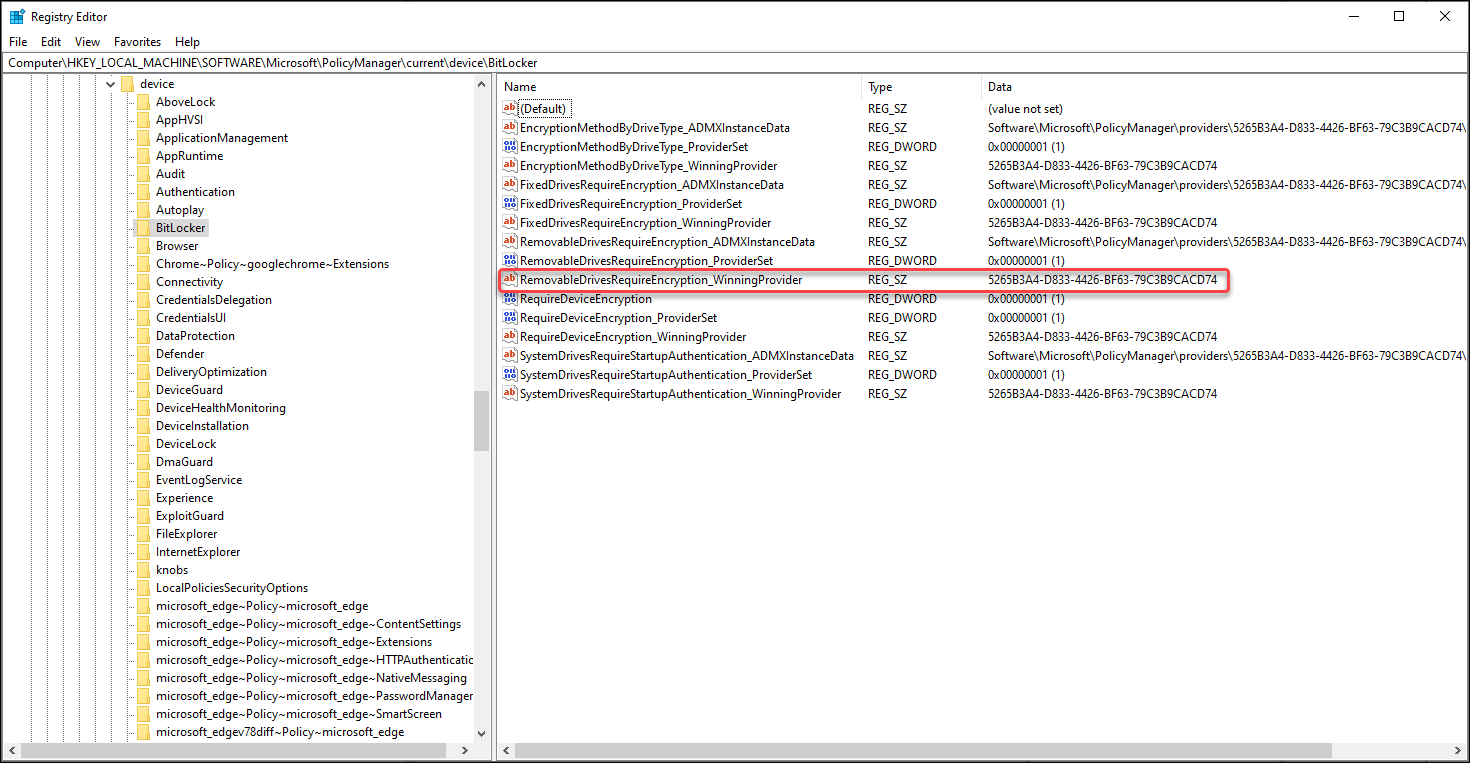
When inspecting the values under the Bitlocker section of the HKEY_LOCAL_MACHINE\SOFTWARE\Microsoft\PolicyManager\current\device registry key you see the a reference to a unique identifier, in my case this looks like this:
Name: RemovableDrivesRequireEncryption_WinningProvider
Value: 5265B3A4-D833-4426-BF63-79C3B9CACD74
From this point forward you can to the following registry key and look up the values which are set under the GUID subkey located under HKEY_LOCAL_MACHINE\SOFTWARE\Microsoft\PolicyManager\Providers\. In the case of our example we can find the related settings here: HKEY_LOCAL_MACHINE\SOFTWARE\Microsoft\PolicyManager\Providers\5265B3A4-D833-4426-BF63-79C3B9CACD74\default\Device\BitLocker
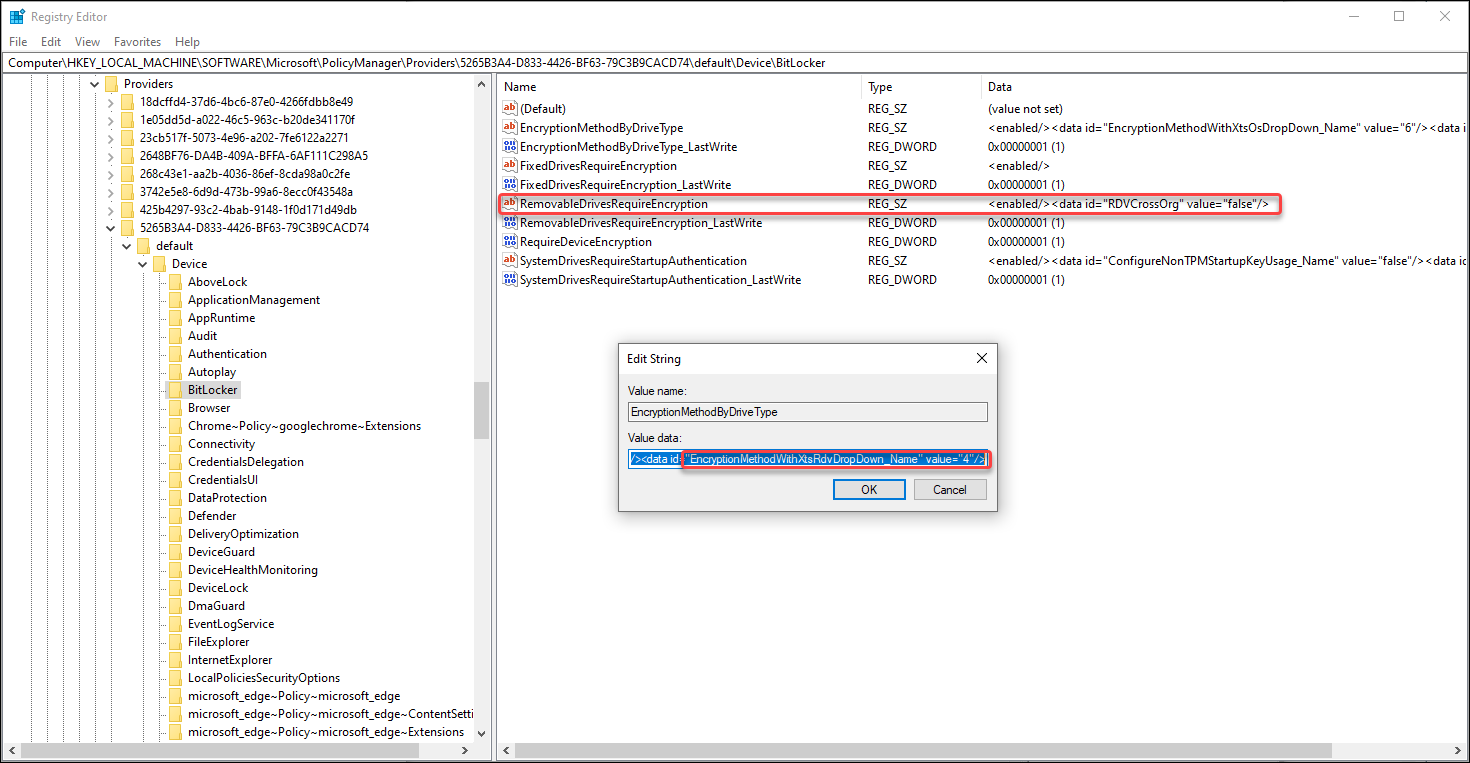
As you can see, both CSP settings are reflected here in XML format as described above.
Since these policies are set in the Local Group policy of the device, we will also see the settings reflected under the HKEY_LOCAL_MACHINE\SOFTWARE\Policies\Microsoft\FVE key, where we can see the following settings
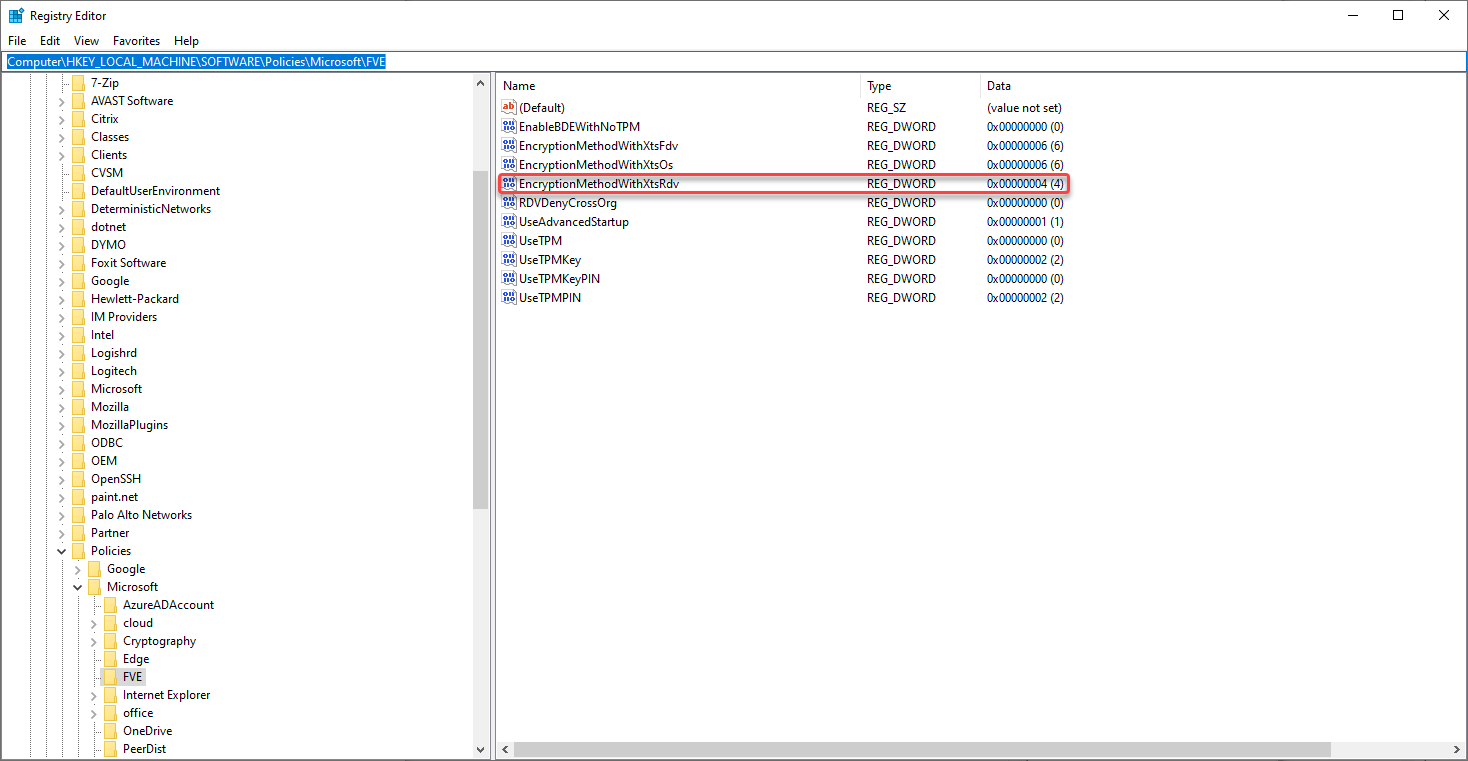
For the EncryptionMethodWithXtsRdv entry we have a one-on-one relationship. For the RemovableDrivesRequireEncryption it works a little bit different. If the setting is there, encryption is required, if it’s value is set to 0 then allow write access to devices configured in another organization is enabled, but when set to 1 the allow write access to devices configured in another organization is disabled.
After the policy is received and a removable device is plugged in, the settings are effective since the following screen will pop up, require us to enable BitLocker if we want to write to the external drive.
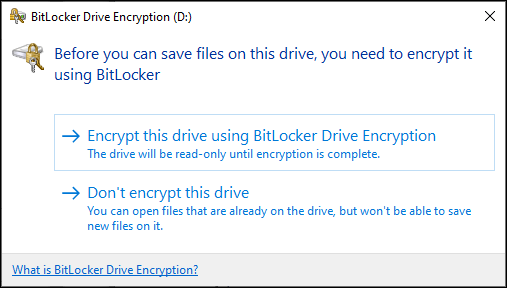
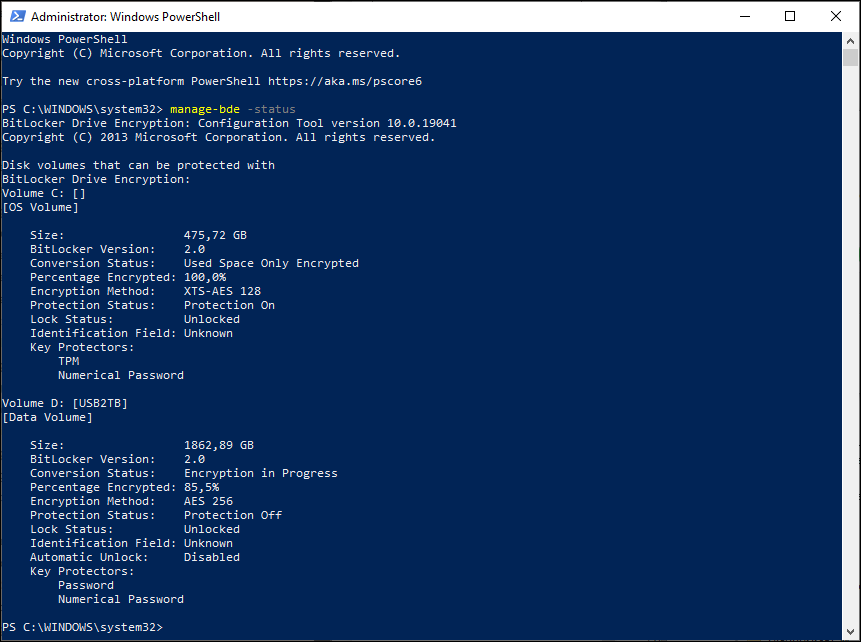
We can also verify whether AES 256 bit encryption is being used by selecting Encrypt this drive using BitLocker Drive Encryption, following the wizard and by verifying the BitLocker settings using the manage-bde command.
If you are looking for settings which are not backed by an ADMX the steps above will partially work. You will not find the settings under the HKEY_LOCAL_MACHINE\SOFTWARE\Microsoft\PolicyManager\current\device registry key. Instead we can find the setting under HKEY_LOCAL_MACHINE\SOFTWARE\Microsoft\Windows\CurrentVersion\PersonalizationCSP which is the location where the settings are configured without the policy part.
Take the Personalization CSP for example, this CSP has the option to define a URL for the Desktop Background image of the user and can be set in a Device Restriction configuration profile.

You can use the SyncML Viewer to see if the policy arrives on the device, which is the case.
And you can find some less detailed information in the event viewer.
Instead of the HKEY_LOCAL_MACHINE\SOFTWARE\Microsoft\PolicyManager\current\device registry key we can find this setting under HKEY_LOCAL_MACHINE\SOFTWARE\Microsoft\Windows\CurrentVersion\PersonalizationCSP which is the location where the settings are configured without the policy part.
The case of the not applying Device Lock settings in the Windows 10 Security Baseline
The reason for going a little bit deeper into the inner workings of the MDM management was due to the following “challenge” I was trying to understand.
When looking at the configured settings for “Device Lock” in the Windows 10 MDM security baseline for December 2020, I noticed the following settings:
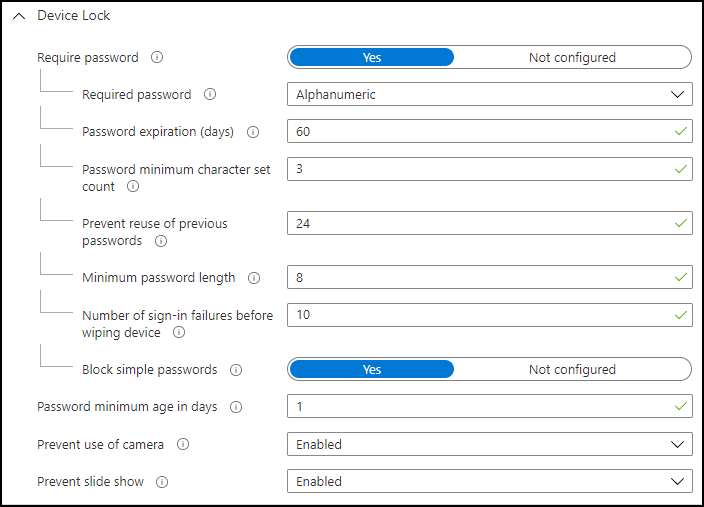
With this MDM security baseline applied I verified on whether these settings are enforced, which is not the case. I can unlock my device with my 6 digit pincode, the pincode doesn’t expire as well. That’s not expected, so with the knowledge from the earlier part of the article let’s investigate further.
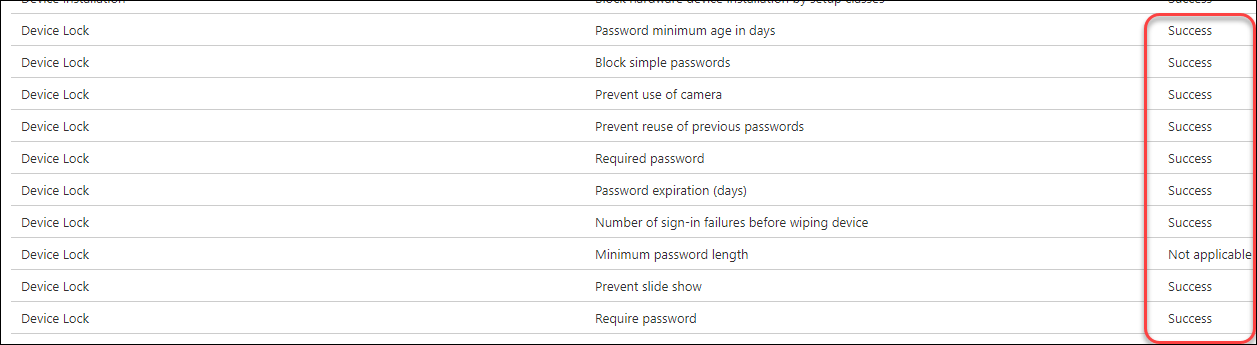
First of all I verified whether the monitoring of the Security Baseline settings provided any error on the Device Lock settings. You can access this data from the Device Status monitoring for the specific Security Baseline
To continue the troubleshooting I started with the “Advanced Diagnostic Report” which can be generated from the Access Work or School account control panel item. The Create Report functionality will create an HTML file detailing all the settings being set on the device.

That is interesting, because the 1 is the setting for the “Default Value” and the 0 represents the current value. So the setting is turned off.
Verified this in the registry as well, under HKEY_LOCAL_MACHINE\SOFTWARE\Microsoft\PolicyManager\current\device\DeviceLock giving me a value of 0 as well.
I’ve did some further testing, and verified that the settings where not working, while the MEM admin portal states that they have been successfully applied.
Time for asking around what is going wrong here, so I decided to create a GitHub issue explaining my question, which was answered by Brent Dunsire, one of the technical writers from Microsoft. He came with the following explanation: “Per the Windows folks, The Device Lock CSPs are ignored as regards PINs when the Passport for Work CSP (Window’s Hello for Business) is set on the same device.”
Hmmmmm… that’s not something I’ve read in documentation somewhere…interesting. Let’s hope that Microsoft starts documenting these kinds of caveats as well.
Conclusion
Tracing what happens from the point that you create a configuration setting all the way to the endpoint and how the setting gets applied, really helps you to understand how MDM management for Windows 10 is working under the hood.
Especially if hundreds of settings are being set on the endpoint, and we are talking about these numbers when using Security baselines together with some other custom configuration profiles it’s easy to loose track. Ideally you want to build a solution where every configuration setting reports that it’s applied successfully and where you can verify that every setting is also really set on the endpoint.
Unfortunately I have seen many examples in different tenants where either the reporting in the MEM admin center is inconsistent or where the settings on the endpoint are not consistent with the configuration settings set in the MEM admin portal. Let’s hope the product team is going to address this behavior and make the solution more robust. If we want to create and build MEM environments for Operations having a consistent environment is a must have.
Don’t get me wrong here, I really think that managing devices using MEM is the way forward, but there are some points which should be addressed in order to make the product even more robust and better.
References
Windows 10 MDM client activity monitoring with SyncML Viewer
Want to watch the MDM client activity in real time?
Intune Public Preview – Windows 10 Device diagnostics
[MS-MDM]: Mobile Device Management Protocol
Troubleshoot policies and profiles and in Intune
Troubleshoot CSP custom settings for Windows 10 computers enrolled in Intune
Troubleshooting Windows 10 Intune Policy Failures
Windows 10 Group Policy vs. Intune MDM Policy who wins?
Configuration service provider reference
Common questions and answers with device policies and profiles in Microsoft Intune
1 thought on “MDM policy processing on Windows 10 with Microsoft Endpoint Manager, a closer look”