
When you host your email on the Exchange Online (EXO) platform part of Office365 you can implement several security measures to make sure that email send from your domain gets delivered to the mailbox of the recipient.
The most known solution for this is by implementing a Sender Policy Framework (SPF) DNS record. By creating a SPF DNS record in your DNS you provide receiving email servers the option to check if the originating IP of the email is also the authorized email server for the domain. If not the email can be considered suspicious and the email system from that point forward can decide to threat the email as spam, phishing and so forth.
If you decide to make the nameservers of Microsoft authoritative, which allows you to manage your DNS settings from the Office administration portal, the SPF record needed can automatically be enabled for you.
For my domain (insight24.nl) the Exchange Online related DNS records look like this:

As you can see, in my case (and all of the Office 365 customers case as well) the email server should be spf.protection.outlook.com. For more information about configuring your SPF record check this article: Set up SPF in Office 365 to help prevent spoofing
While implementing SPF DNS records helps to make sure that the emails send out from your email environment actually get delivered, SPF has some limitations. Some of these limitations are:
SPF, has some well-known limitations though. For example, SPF uses the Return-Path address for its crosscheck, some spam email fakes the From address – so that users see the fake FROM address, and the email successfully validates against SPF, therefore the email is considered valid.
Another disadvantage would be that if the malicious sender uses Office365 as well, the SPF record would be valid. Of course Microsoft has security measures in place to detect this and block these senders, but before doing so, they might do harm.
DKIM and DMARC to the rescue
By implementing DomainKeys Identified Mail (DKIM) and Domain-based Message Authentication, Reporting and Conformance (DMARC), you can further strengthen the reputation of the email send out by Office 365. You do this by adding extra authentication mechanisms.
SPF adds information to a message envelope but DKIM actually encrypts a signature within the message header. When you forward a message, portions of that message’s envelope can be stripped away by the forwarding server. Since the digital signature stays with the email message because it’s part of the email header, DKIM works even when a message has been forwarded
In my work I already see some suppliers and customers requiring DKIM and DMARC as an extra authentication mechanism in order to guarantee that email send from the tenants domains to get delivered to the mailbox of its users.
From the documentation:
You should use DKIM in addition to SPF and DMARC to help prevent spoofers from sending messages that look like they are coming from your domain. DKIM lets you add a digital signature to outbound email messages in the message header. When you configure DKIM, you authorize your domain to associate, or sign, its name to an email message by using cryptographic authentication. Email systems that receive email from your domain can use this digital signature to help determine if incoming email that they receive is legitimate.
More information can be found here: https://docs.microsoft.com/en-us/microsoft-365/security/office-365-security/use-dkim-to-validate-outbound-email
Domain-based Message Authentication, Reporting, and Conformance (DMARC) works with Sender Policy Framework (SPF) and DomainKeys Identified Mail (DKIM) to authenticate mail senders and ensure that destination email systems trust messages sent from your domain. Implementing DMARC with SPF and DKIM provides additional protection against spoofing and phishing email. DMARC helps receiving mail systems determine what to do with messages sent from your domain that fail SPF or DKIM checks.
More information can be found here: https://docs.microsoft.com/en-us/microsoft-365/security/office-365-security/use-dmarc-to-validate-email
Enabling DKIM
We can check for the DNS records be created by executing the following command in Exchange Online PowerShell:
Get-DkimSigningConfig -Identity <domain> | fl Selector1CNAME, Selector2CNAME
If you receive an error stating “The operation couldn’t be performed because object ‘<your domain>’ couldn’t be found on <servername>, you first need to create a new DKIM signing configuration
New-DkimSigningConfig -DomainName <domain> -KeySize 2048 -Enabled $true
We now have to create DNS records, you can find the content of the DNS records by using the Get-DkimSigningConfig command above. The CNAME DNS records should look similar to the definition below:
 Host name:            selector1._domainkey
 Points to address or value:    selector1-<domainGUID>._domainkey.<initialDomain>
 TTL:                3600
 Host name:            selector2._domainkey
 Points to address or value:    selector2-<domainGUID>._domainkey.<initialDomain>
 TTL:                3600
Once the DNS records are created and available, we can enable DKIM signing using the following command:
Set-DkimSigningConfig -Identity <domain> -Enabled $true
For more information see: https://docs.microsoft.com/en-us/microsoft-365/security/office-365-security/use-dkim-to-validate-outbound-email#steps-you-need-to-do-to-manually-set-up-dkim-in-office-365
In order to connect to Exchange Online using PowerShell, please use the Exchange Online Management EXOv2 Module, for more information about how to use see this blog written by Michel de Rooij: Exchange Online Management using EXOv2 module
Note: Connecting to the Exchange Online via PowerShell is best to be done using the following PowerShell script: “ConnectExchangeOnlinePowerShell.ps1” which can be downloaded from https://gallery.technet.microsoft.com/office/Connect-to-Exchange-Online-7d7365e0.
In my case we must use the ./ConnectExchangeOnlinePowerShell.ps1 -MFA option, since we have MFA enabled for all administrator accounts.
See: https://o365reports.com/2019/08/22/connect-exchange-online-powershell/?src=technet for more usage on using the PowerShell script.
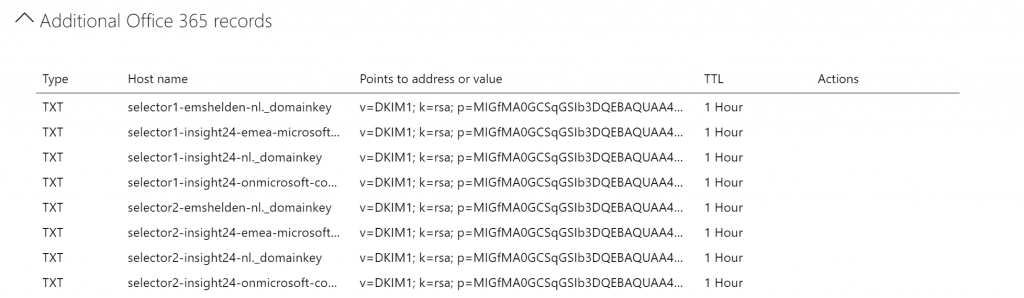
In my case two CNAME DNS records must be created, which point to insight24.onmicrosoft.com (our unique domain name within the onmicrosoft.com namespace).

When looking at the DNS Settings under the insight24.onmicrosoft.com domain you can see two TXT records created for the Insight24.nl domain containing all the information needed for the receiving email server to decrypt the message. By doing this, Microsoft and you are capable of changing the configuration from within Office 365 even if DNS is hosted externally.
Enabling DMARC
For DMARC its advised to implement the setting in a multi phase approach, since incorrectly configuring DMARC can cause email not to be delivered, and we don’t want that.
In order to determine the DNS record to be created for DMARC, you can use this online tool (among others):t: https://www.kitterman.com/dmarc/assistant.html? . The tool also provides guidance on the options available.
| Description | Options | construct |
| Requested policy type | None;quarantine;reject | P |
| Aggregate Data Reporting Address | secops@insight24.nl | rua |
| Forensic Data Reporting Address | Fua | |
| Failure reporting options | 0;1;d;s | Fo |
| DKIM identifier alignment | Relaxed (default);strict | Adkim |
| SPF identifier alignment | Relaxed (default);strict | Aspf |
| Report Format | Afrf (default);iodef | Rf |
| Apply policy to this Percentage | 0 – 100 | Pct |
| Subdomain Policy: Defaults to same as domain | None;quarantine;reject | sp |
Phase 1
In phase 1 we are going to enable the DMARC DNS record, but ask external domains not to do anything yet if validation fails, by using the rua option we can have reports about the behavior sent to secops@insight24.nl for further inspection. Create the following TXT record in your domain _dmarc with value:
v=DMARC1; p=none;
rua=mailto:secops@insight24.nl; fo=0; adkim=r; aspf=r; pct=50; rf=afrf; ri=86400; sp=none
Phase 2
In phase 2 we are going to request the receiving party to quarantine the email if DKIM fails, we will do this for 50% of the email.
v=DMARC1; p=quarantine;
rua=mailto:secops@insight24.nl; fo=0; adkim=r; aspf=r; pct=50; rf=afrf; ri=86400; sp=none
Phase 3
In phase 3 we are going to request the receiving party to quarantine the email if DKIM fails, we will do this for 100% of the email.
v=DMARC1; p=quarantine;
rua=mailto:secops@insight24.nl; fo=0; adkim=r; aspf=r; pct=100; rf=afrf; ri=86400; sp=none
Doublecheck your settings
You can check the email headers of an email send out by the email domain, within the header we can check for a DKIM pass and DMARC pass.
See: To Confirm DKIM signing is configured properly for Office 365 – https://docs.microsoft.com/en-us/microsoft-365/security/office-365-security/use-dkim-to-validate-outbound-email#to-confirm-dkim-signing-is-configured-properly-for-office-365. This same procedure can be used to check DMARC validation.
We can also verify the created DNS records by doing a crosscheck on https://mxtoolbox.com/
What about services sending out email on behalf of your domain?
When you have services, which send out email on behalf of your domain, you should already have implemented something for these services in your SPF record. Take for example salesforce, if salesforce is configured to send out email on behalf of your domain, your SPF record should look similar to this: “v=spf1 include:spf.protection.outlook.com include:_spf.salesforce.com -all”
Luckely Salesforce provides guidance on how to enable DKIM:
Considerations for Creating DKIM Keys
Requirements for a DMARC policy to pass for sends through the Marketing Cloud
Conclusion
With DKIM and DMARC implemented you can strengthen the reputation of the email send out by your Office 365 tenant, even though implementing DKIM and DMARC is a precise operation, it’s worthwhile doing so. So act now.
It might be though that you use services which send out email on your organizations behalf, contact the supplier of that service in order to make sure that they support DKIM and DMARC.
2 thoughts on “Did you already enable DKIM and DMARC for your Office 365 domains?”