Apple Business Manager is a service provided by Apple which helps to deploy Apple devices and apps in your organization. By leveraging Apple Business Manager (ABM) you can automatically enroll devices in Microsoft Endpoint Manager by using Automated Device Enrollment (ADE). You could say it provides similar functionality as to what Windows Autopilot provides for enrolling Windows devices, but ABM (then still called Device Enrollment Program a.k.a. DEP) was available long before Windows Autopilot even existed.
In this article we will go through the steps to request access to Apple Business Manager, and how to setup and integrate ABM with Azure Active Directory, so that you can authenticate to ABM using your Azure AD account. We will also setup synchronization of our Azure AD accounts to ABM which from that point forward will be managed Apple IDs.
Doing this is a first step to take into fully integrating ABM with Microsoft Endpoint Manager/Intune, so that we can perform automatic enrollments of macOS/iOS/iPadOS devices. More on that in follow up articles to follow on this blog.
Enroll into Apple Business Manager program
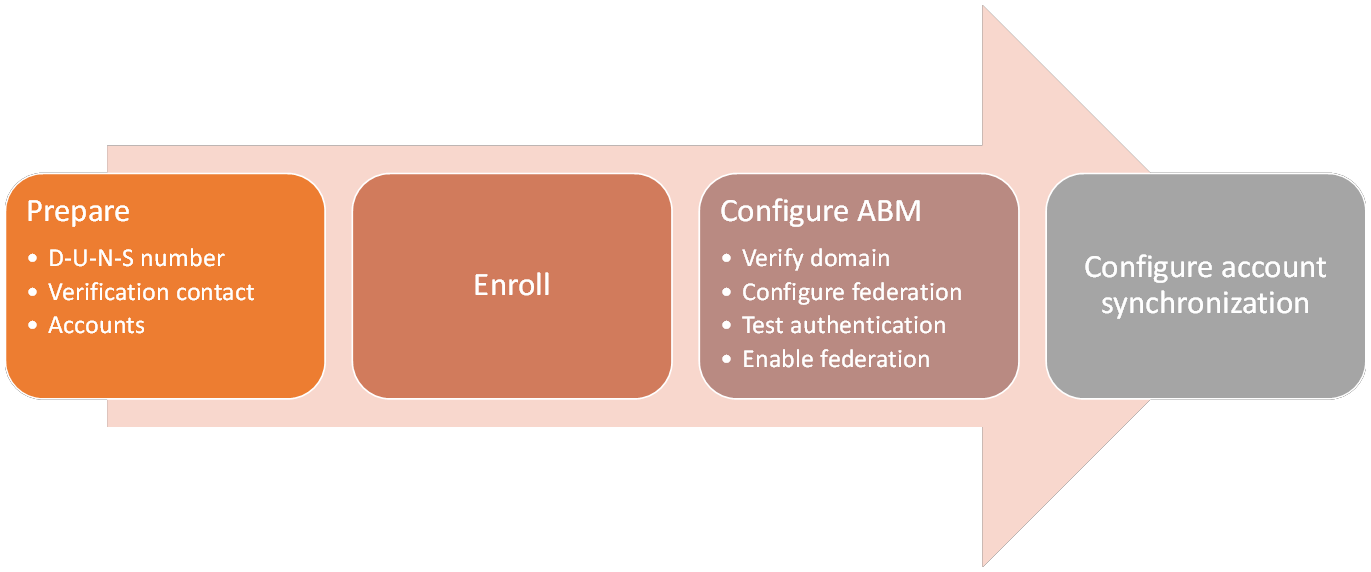
Setting up ABM consists of the following steps detailed in the figure below, this article will go through all the steps
This blogpost contains the following sections:
Prepare
Before you enroll in to the ABM program, I advise to have some information available upfront. This information is your company’s D-U-N-S number (which I will explain below), and a contact person who can verify your company and has the authority to do so.
D-U-N-S number
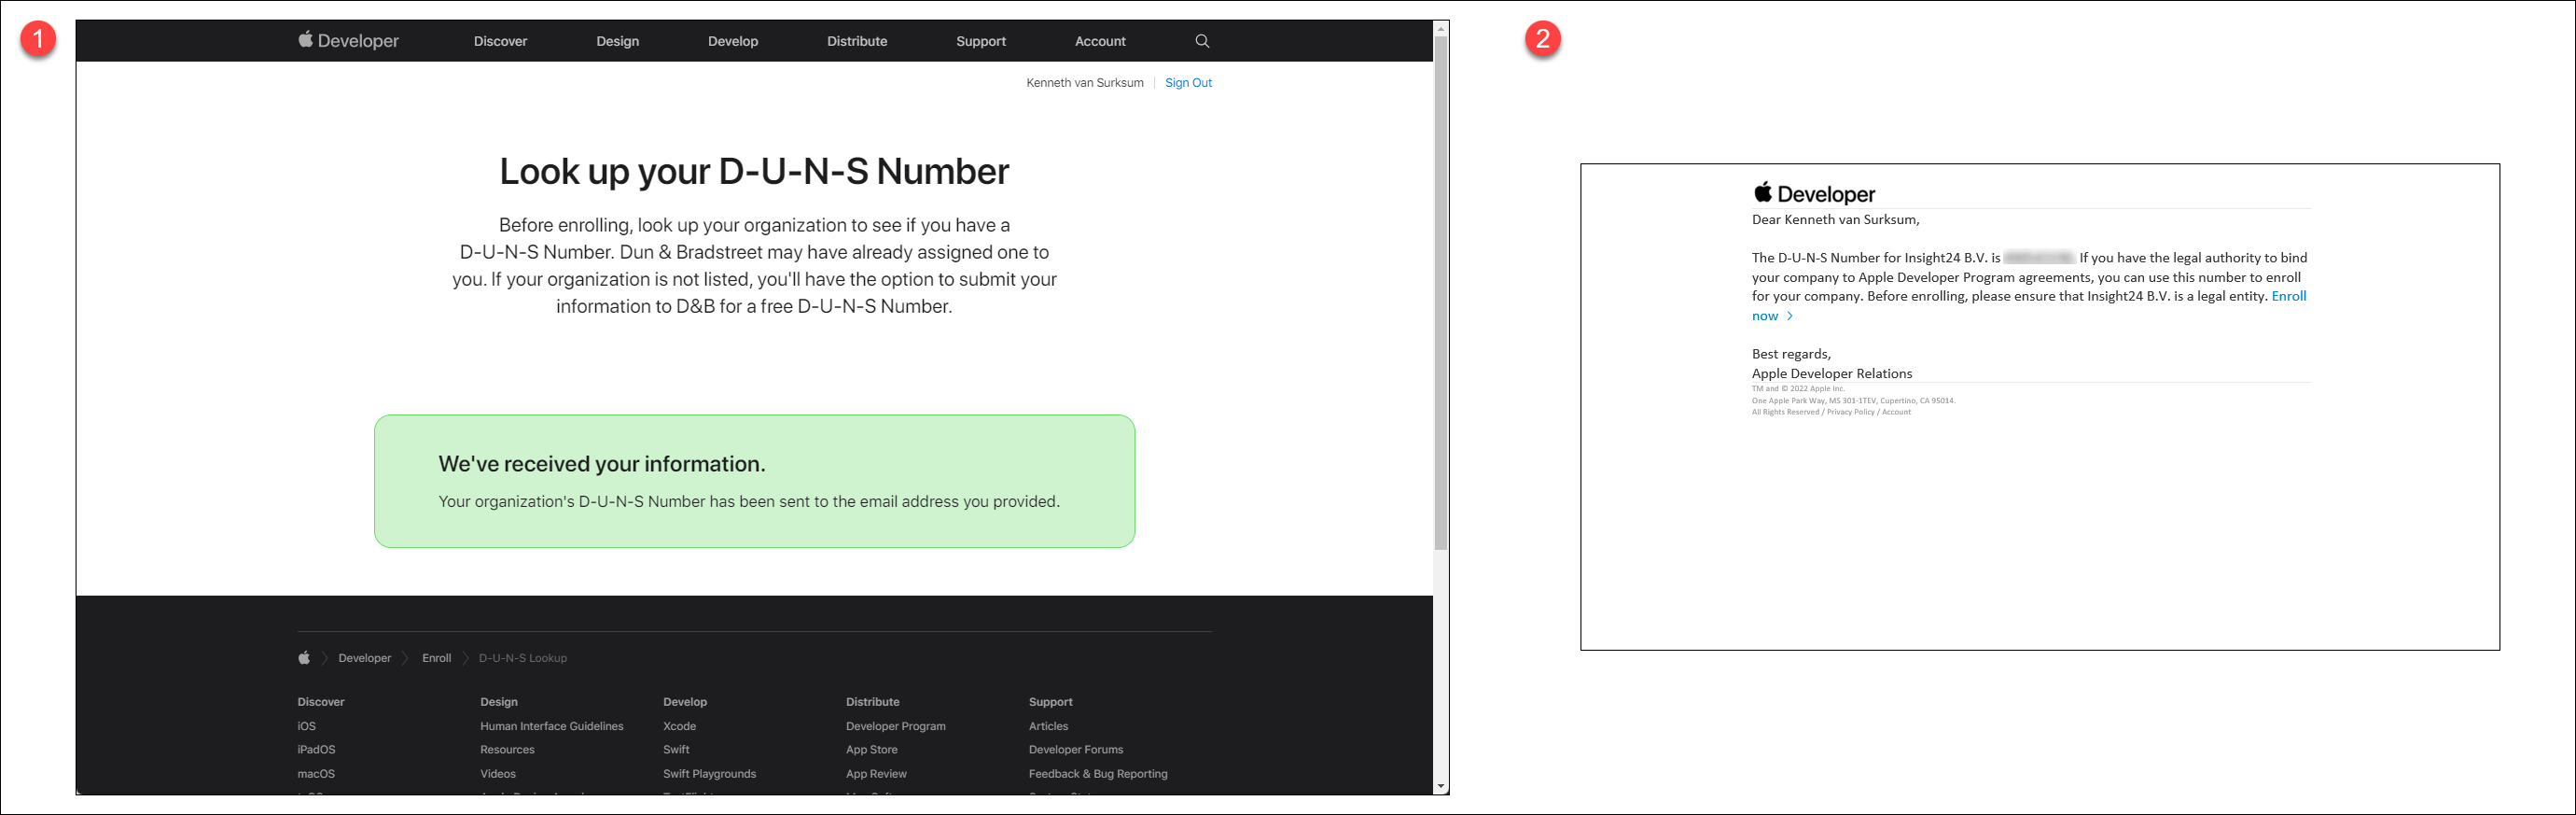
D-U-N-S numbers are assigned to each business by a company called Dun & Bradstreet (D&B) which maintains a database. The D‑U‑N‑S Number is a unique nine-digit identifier for businesses. Apple cross-checks program enrollees with this database. You can verify whether your company is listed in the database by using the following URL: https://developer.apple.com/enroll/duns-lookup/
For this to work, you must login with an Apple ID, fill in the details of your business which will eventually result in the screen below, and a corresponding email sent to the email bound to the Apple ID with your D-U-N-S number attached.
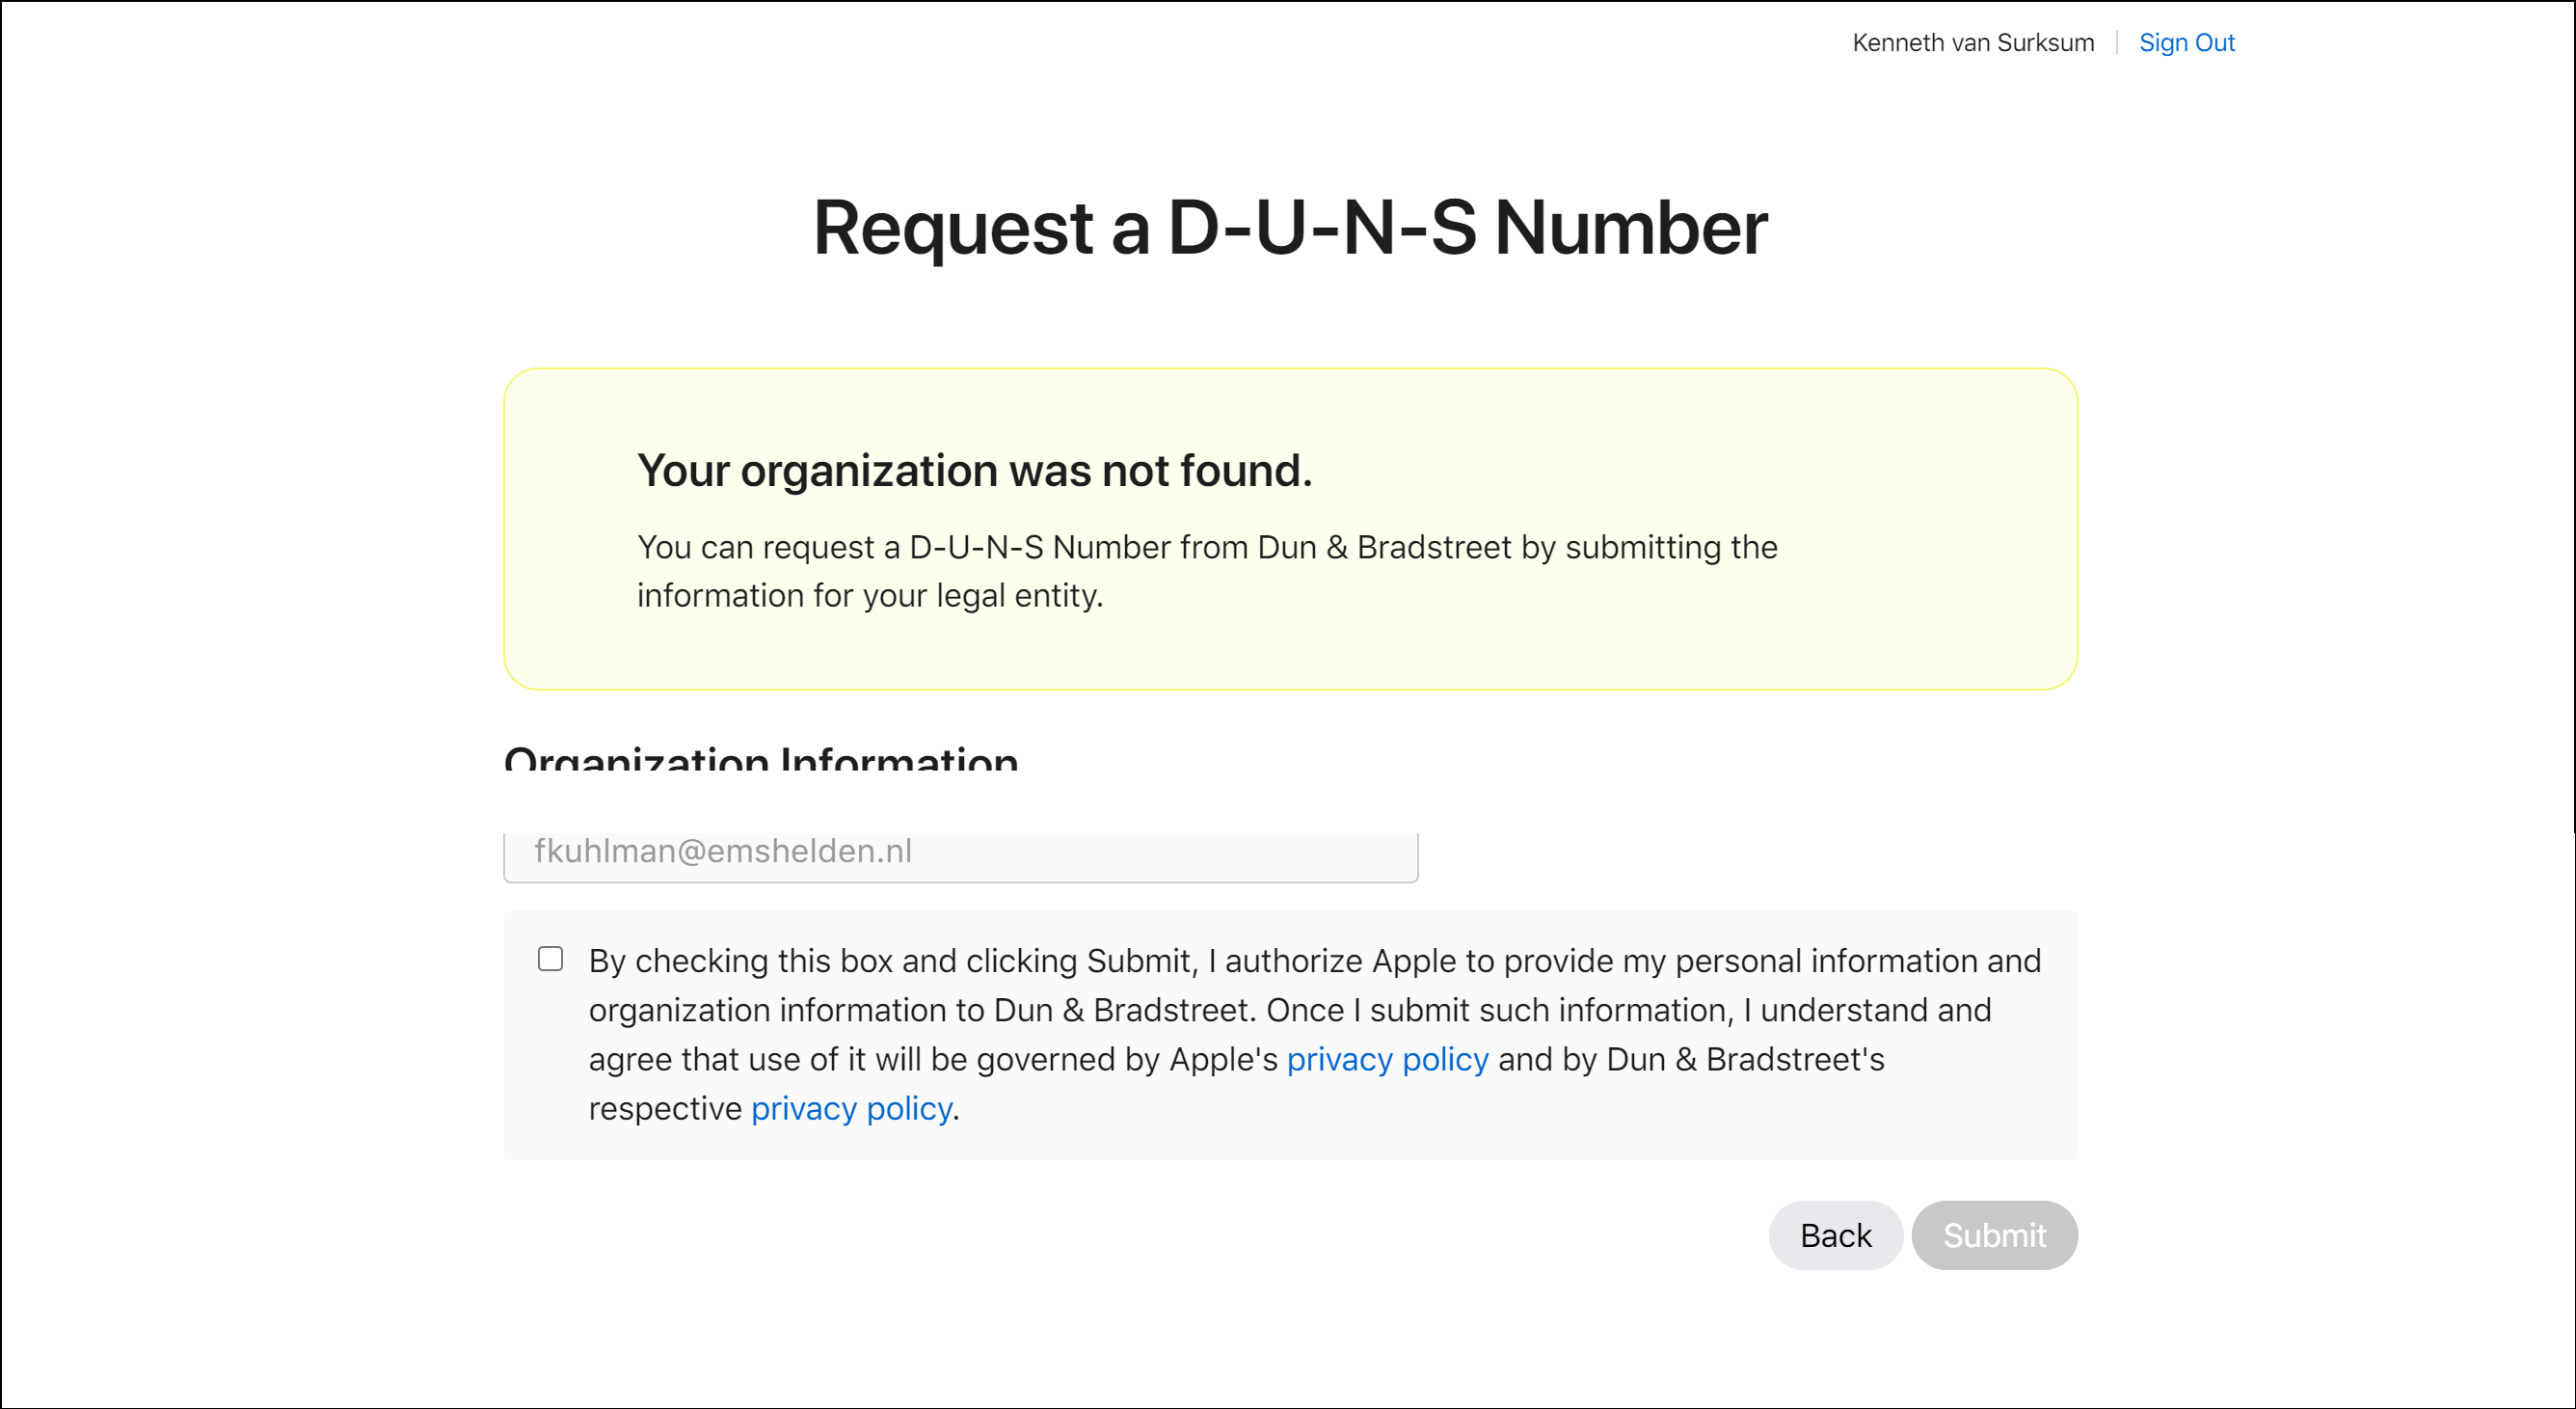
If your D-U-N-S number cannot be found in the database, you will have the option to submit your information so that it can be considered for inclusion into the database. Keep in mind that the total time of requesting the ABM access can take considerable longer in that case.
Verification contact
Someone within your organization who can bind the ABM terms and conditions to your organization. This can be your CEO, CTO, CIO etc.. Apple will reach out to the person you specify by phone and will verify your request with this person.
Accounts
During the process you need the following accounts.
- Apple Business Manager Administrator account
- Azure AD admin account with one of the following (permanent/assignable) roles (Global -, Application – or Cloud Application Administrator)
- Azure AD normal account with same UPN as domain to verify (with temporary role) for verification
The enrollment process
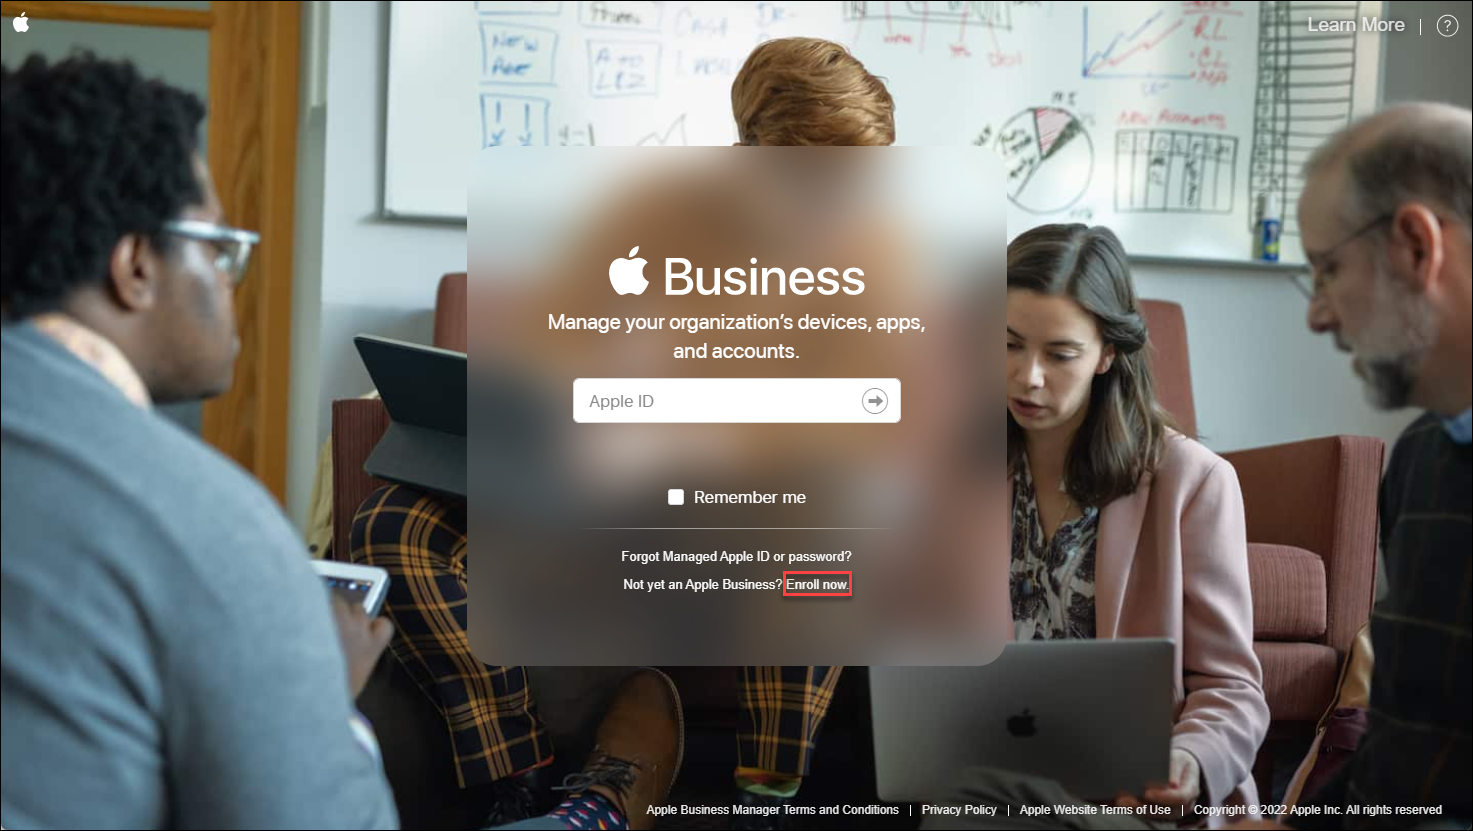
If you want to use Apple Business Manager, you must enroll into the program first. You can enroll into the program by visiting https://business.apple.com and by clicking on the Enroll now text which will bring you to another page where you can fill in the details needed.
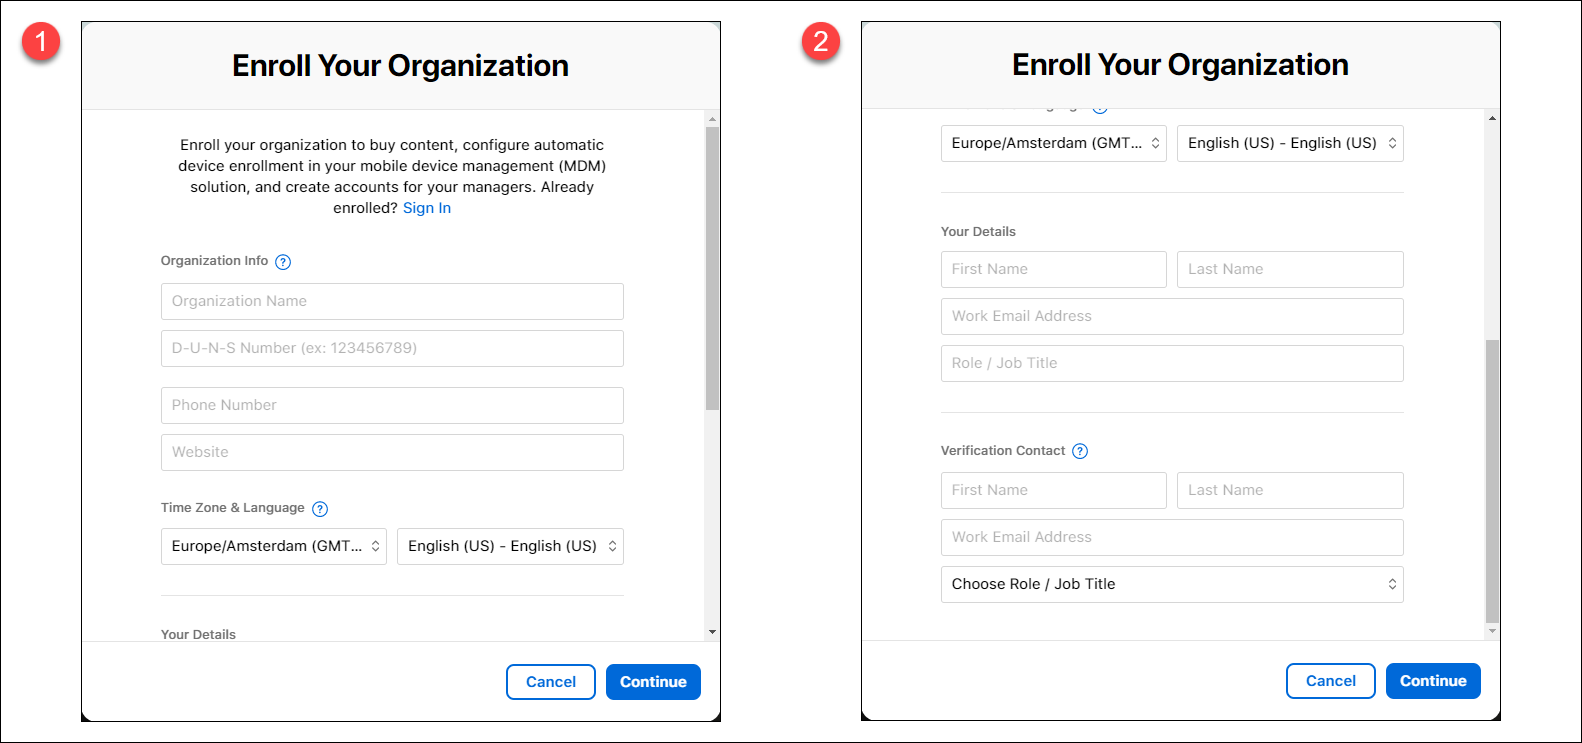
In the Enroll Your Organization form you can specify all the necessary information, you will need the D-U-N-S number there (1) and the contact details of your internal verification contact (2).
After filling in the information you just have to wait, the verification contact will be contacted by a representative from Apple to perform the verification.
Once this verification has taken place, and the Apple representative approves your enrollment request you will receive an email from Apple informing you that your enrollment has been approved.

If you click the Get Started link, you will be redirected to an Apple website where you can create a new Apple ID, which you can use to access the Apple Business Manager environment.
Tip: I used a + address for ABM on my normal account, so that my account itself can still be synchronized later when we start syncing the Azure AD accounts to ABM.
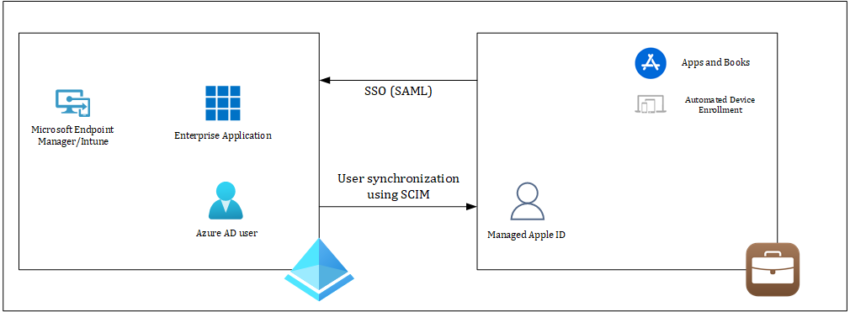
Once enrolled, you have access to the ABM portal, and we can start configuring the Single Sign-On (called Federated Authentication in ABM) with Azure AD and configure account synchronization from Azure AD to ABM.
Configure Apple Business Manager
Once we have access to ABM, we can turn on and test federated authentication. By configuring federated authentication Azure AD will be configured as the Identity Provider (IdP) that authenticates the user for Apple Business Manager and issues authentication tokens.
Because ABM supports Azure AD, other IdPs that connect to Azure AD—like Active Directory Federation Services (AD FS)—will also work with ABM. Federated authentication uses Security Assertion Markup Language (SAML) to connect Apple Business Manager to Azure AD.
Federated authentication can be configured in 3 steps:
- Verify the domain
- Configure the federated authentication process
- Test authentication with a single Azure AD domain account
Verify the domain
The first thing we are going to configure in ABM is to verify the domains which belong to our organization.
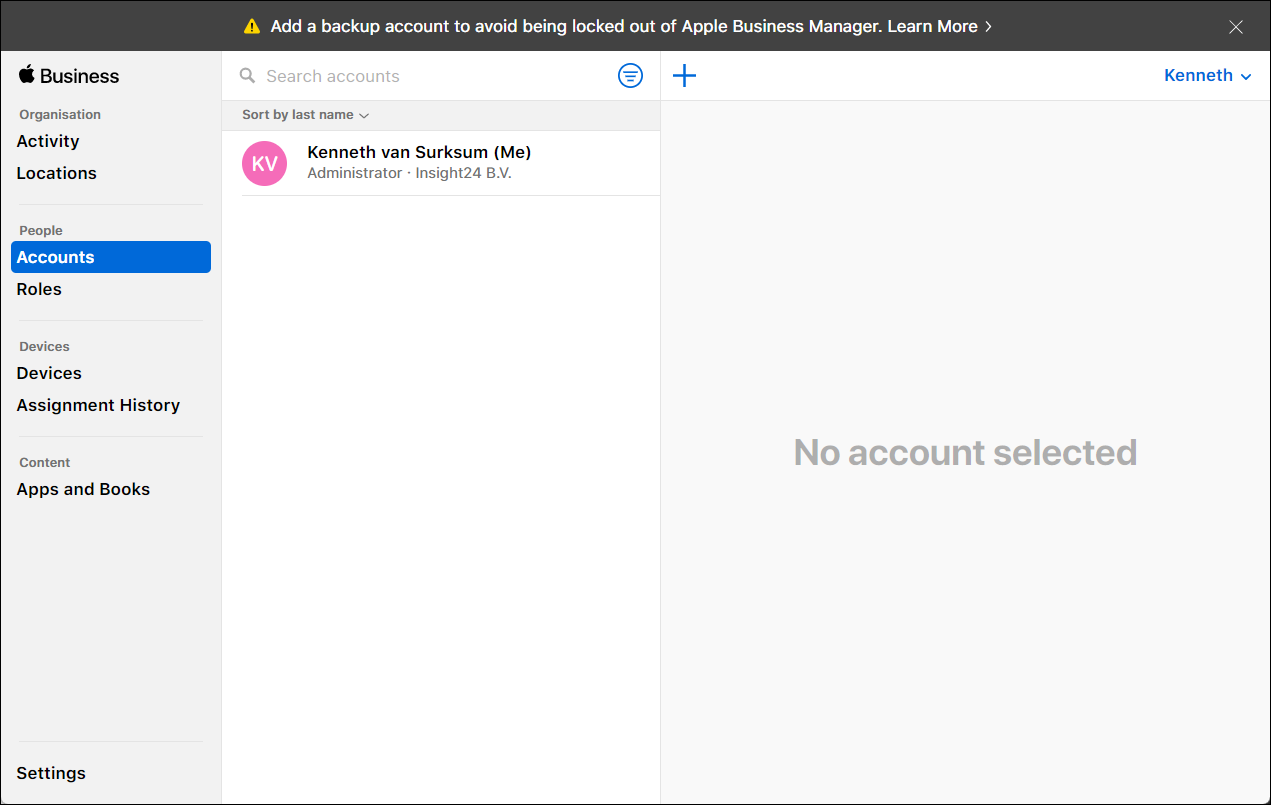
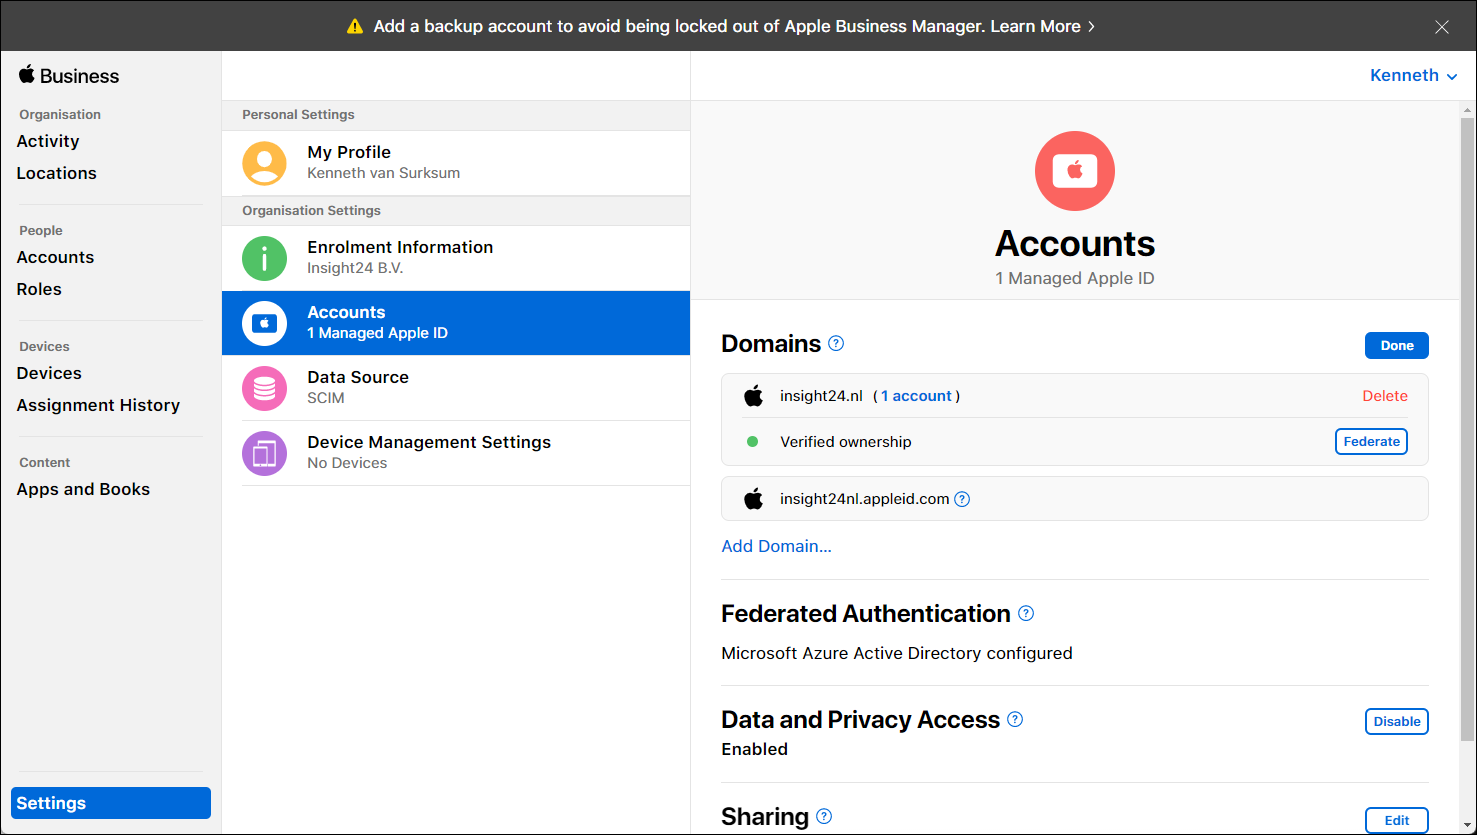
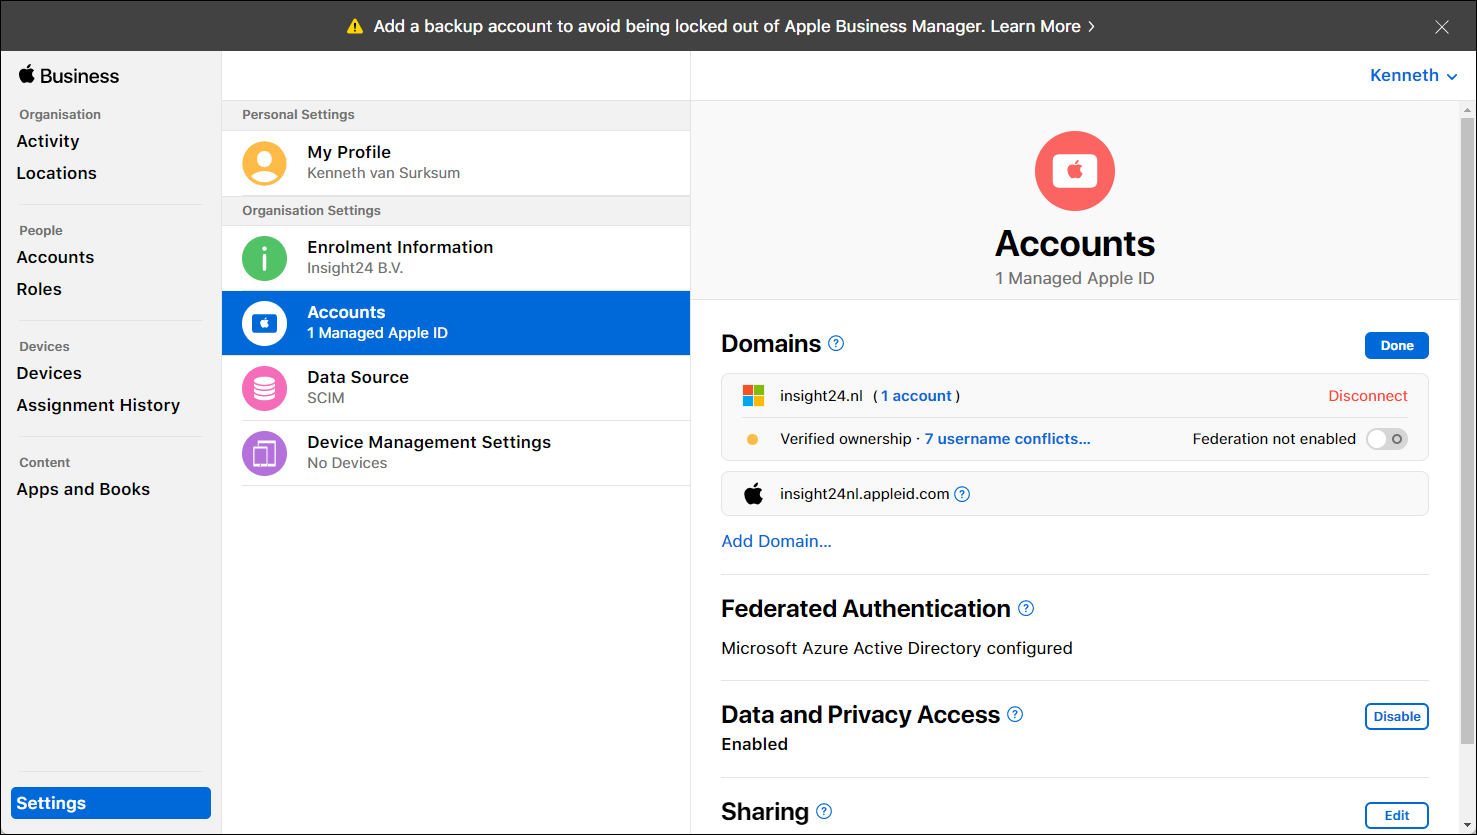
You can configure this setting from the Settings sections by selecting Accounts under “Organisation Settings”.
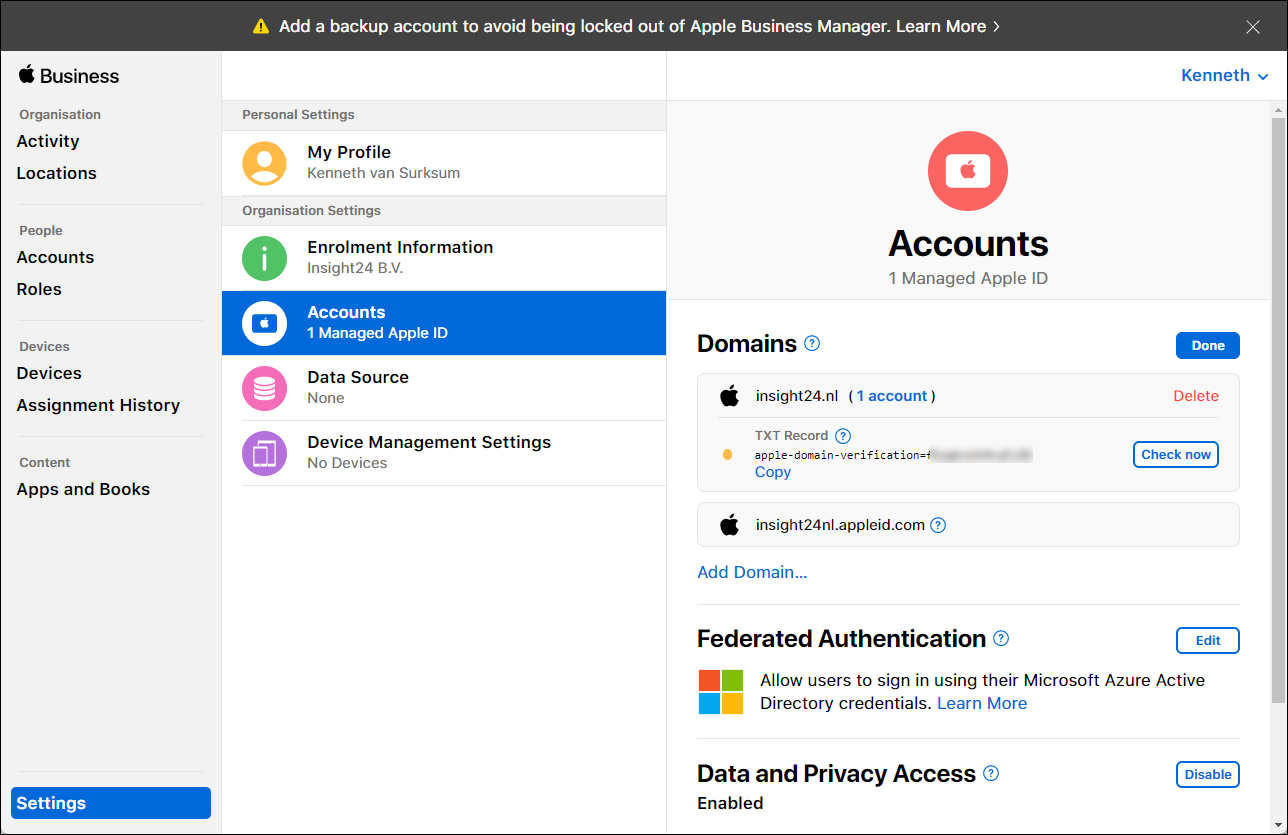
As you can see, in the figure above, the insight24.nl domain is not verified yet as it has a yellow icon in from of the domain name. We can start the verification by clicking on “Edit” which will show you the message that the domain is not verified. If you click on “Verify” you will be requested to create a TXT DNS record with a certain value, which will be used to prove that you are the owner of the domain (since you can create DNS records, which only the owner of the domain can do)
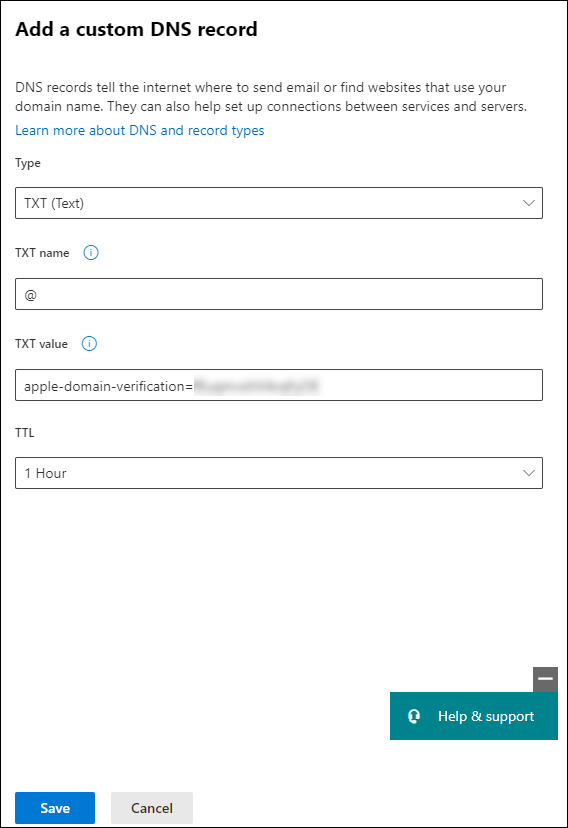
Create the requested TXT record into your DNS configuration, below is a screenshot on how this looks if you manage your DNS using the Microsoft 365 Admin portal. Keep in mind that the TXT name must be “@” and the value should be the whole value as defined in the ABM portal
Once the configured TXT records has been verified the shown record and Copy button should change to Verified ownership.
Configure the federated authentication process
Once the domain has been verified, we can continue with setting up the federation by clicking on the “Edit” button next to Federated Authentication, and then click on “Connect”
Next to Federated Authentication, click Edit, then click Connect.
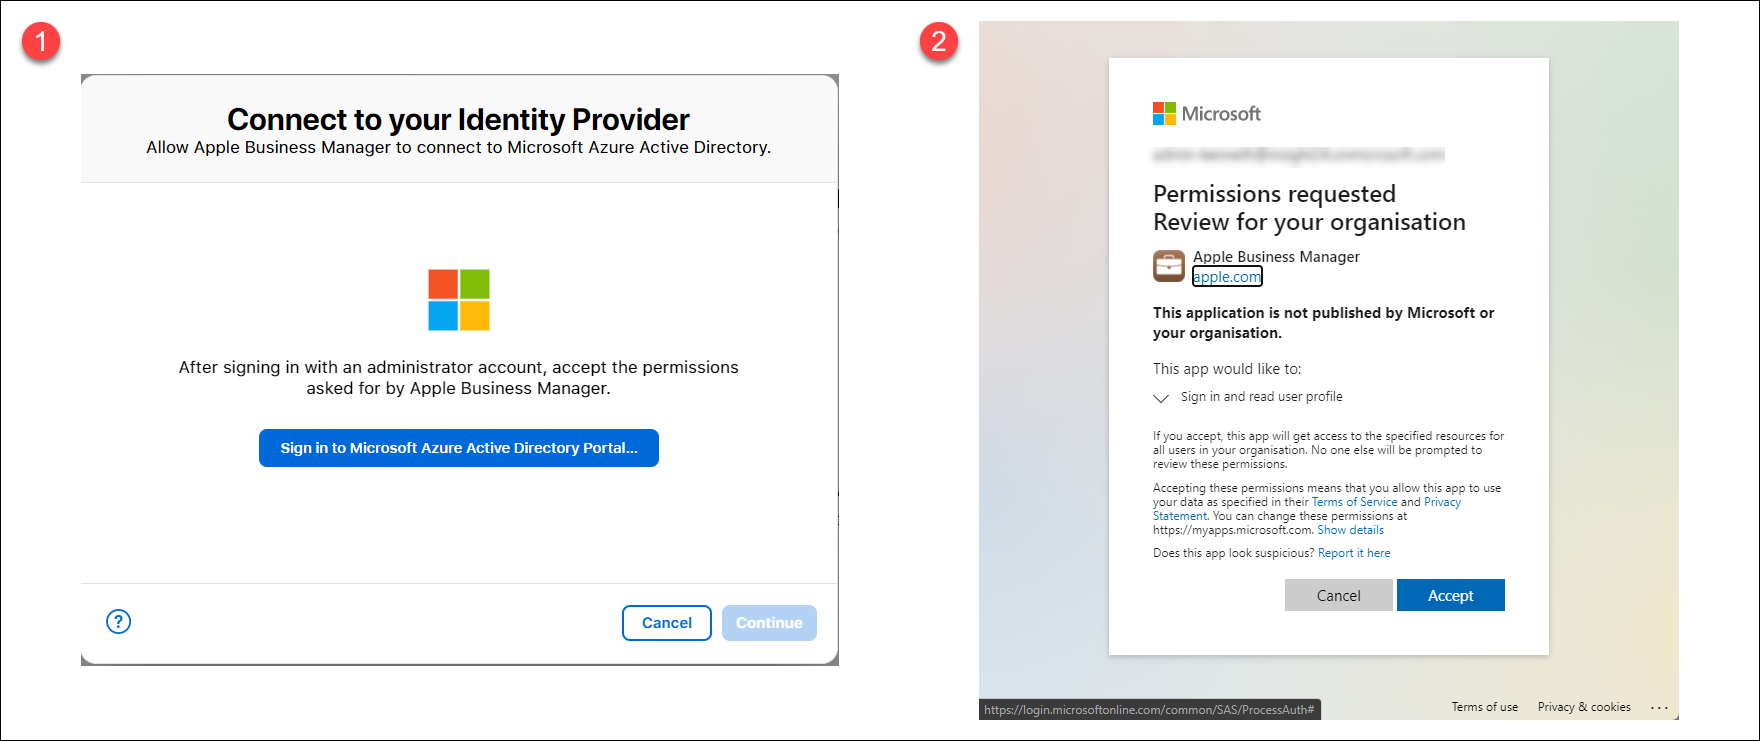
The first screen shown (1) will ask you to sign in to Azure Active Directory, you must do this with an account which has one of the following Azure AD roles active:
- Microsoft Azure AD Global Administrator
- Application Administrator
- Cloud Application Administrator account
You will be provided with a “Consent request” (2) which must be accepted in order for an Azure AD Enterprise Application to be created.
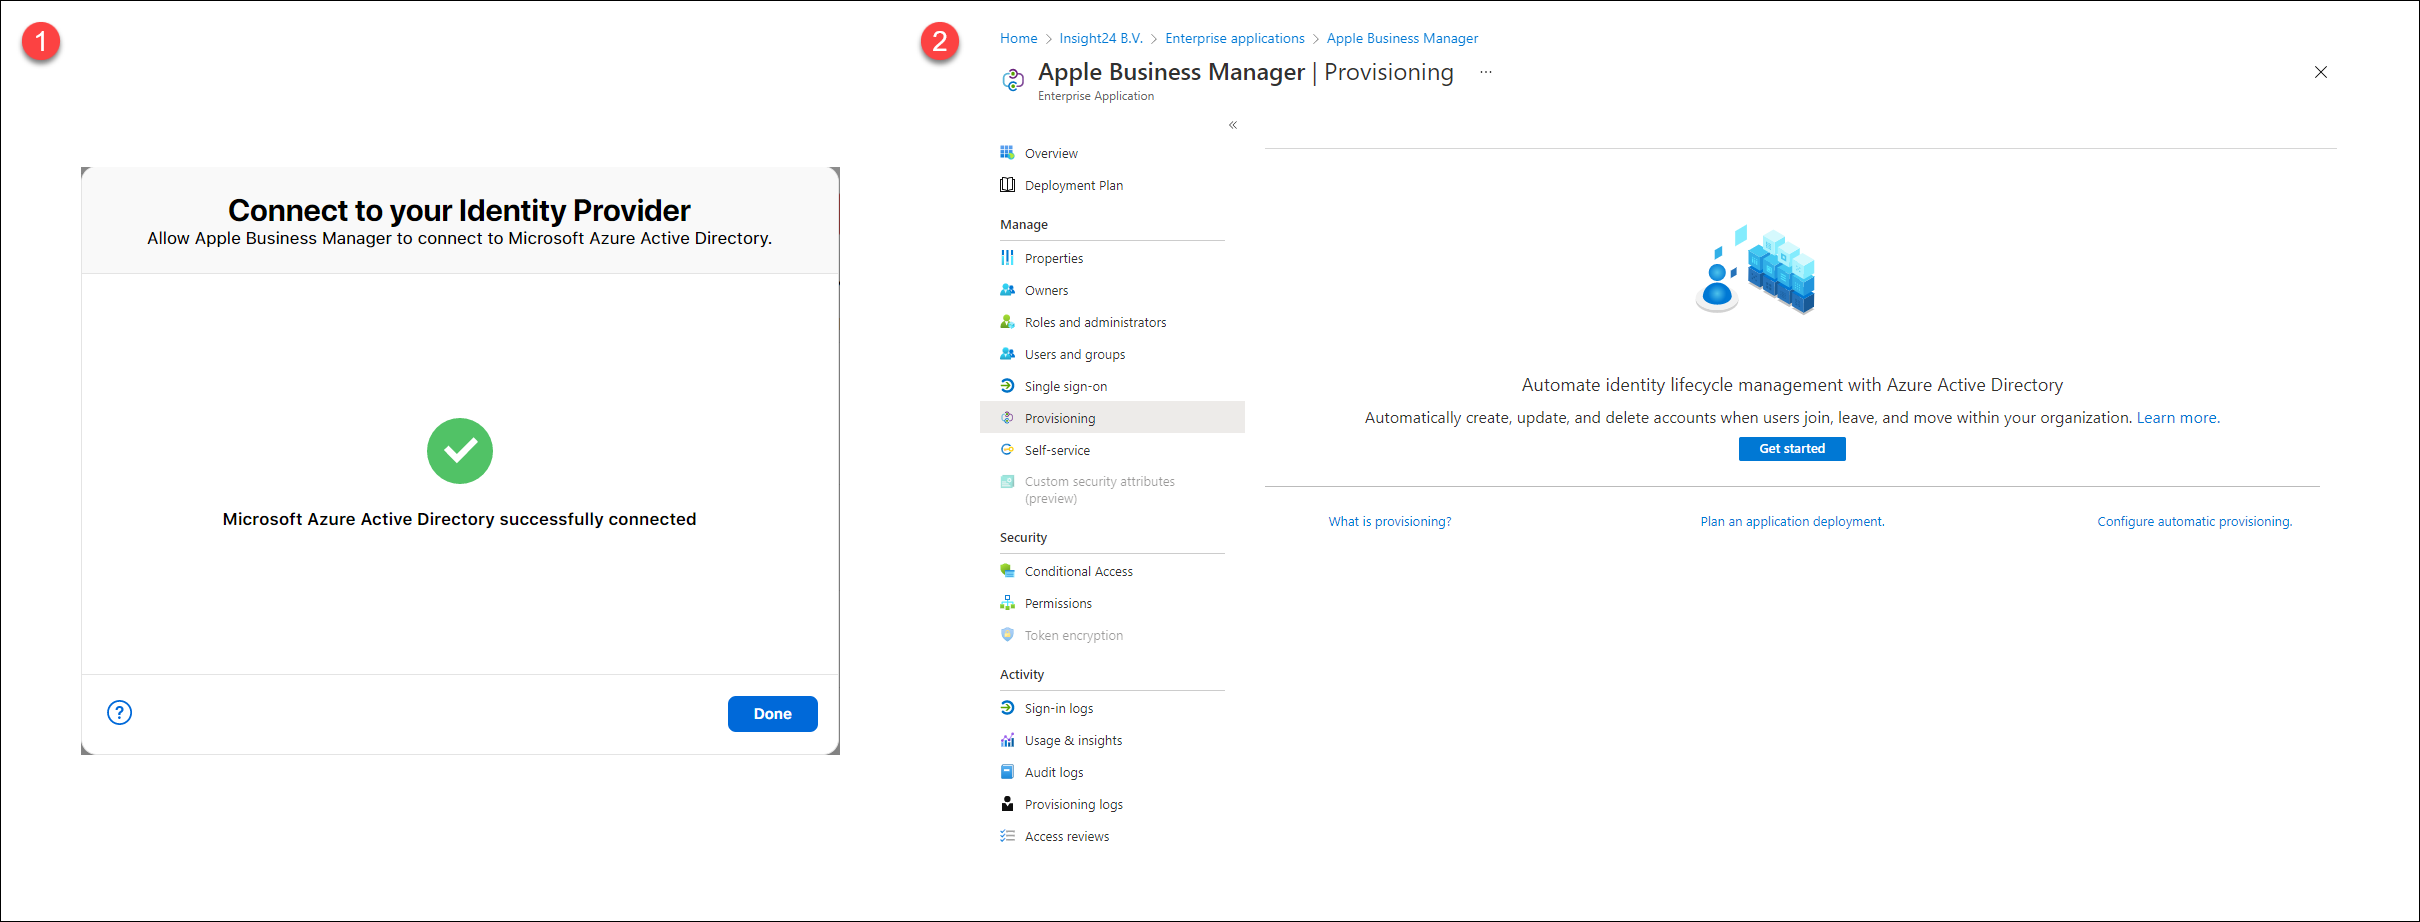
Once the necessary permissions are accepted, you will receive a notification that Azure AD is successfully connected (1). You will also notice that within Azure AD an Enterprise Application called “Apple Business Manager” is created (2).
Test authentication
After you successfully configured the federation, you must test the authentication with an Azure AD account. This account must have a UPN which ends with your domain, but must also have one of the earlier defined Azure AD roles (Global -, Application – or Cloud Application Administrator). For me this was challenging since all my admin accounts use the onmicrosoft.com UPNs and never one of my hosted domains. In order for this to succeed, I temporarily had to give my own account an Azure AD role.
Click on “Federate” next to the domain you want to validate, and then sign in to the Azure Portal using the account with the necessary UPN and Azure AD roles configured.

This task allows Apple Business Manager to trust Azure AD. After you have verified ownership of your domain and successfully tested authentication with a single Azure AD account, you can now create additional accounts and continue federating your domain.
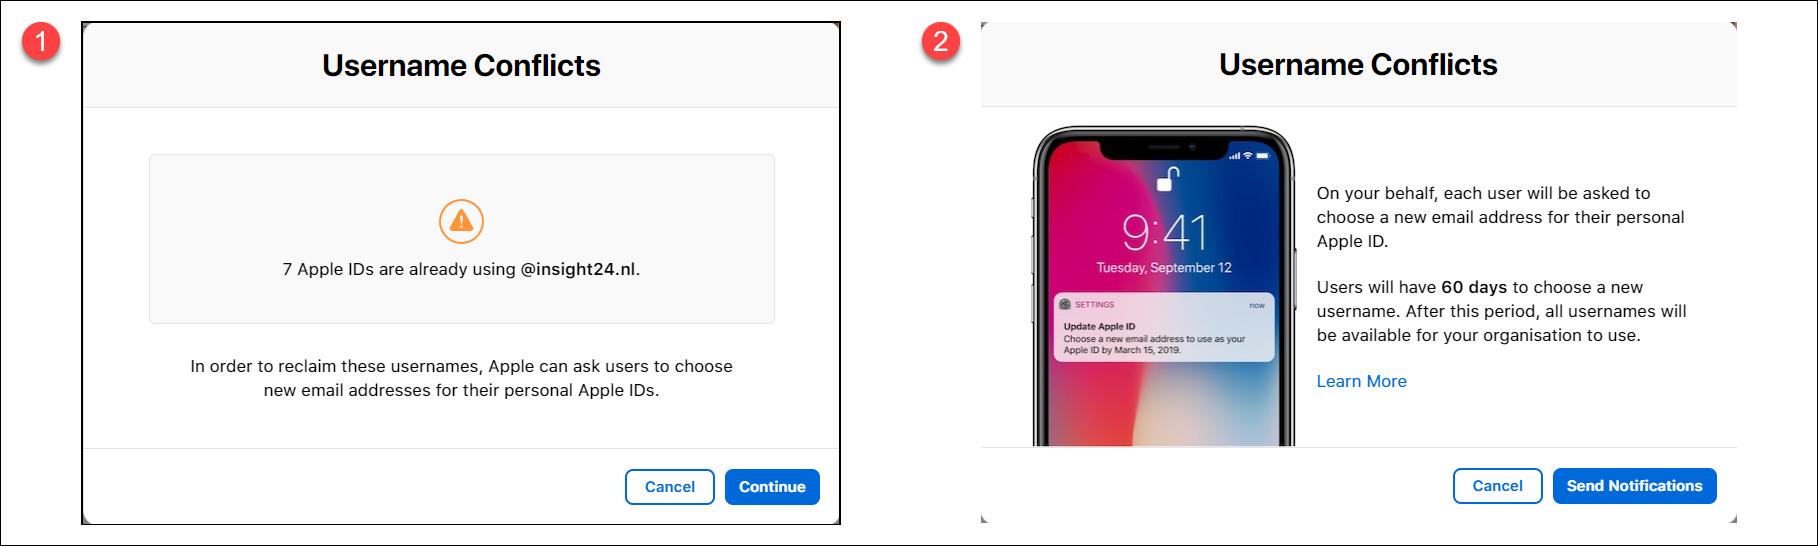
After sign-in is successful, ABM checks for user name conflicts with this domain. User name conflicts arise when users created an Apple ID with the domain you want to federate before you enabled and configured ABM.
As you can see in the screenshot above, within my domain we have 7 username conflicts. You will be notified that each user will be asked to choose a new email address for their personal Apple ID. Users will have 60 days to reconfigure their Apple ID. After 60 days, the conflicting Apple IDs become available for use in ABM.
Enable Federation
Once the ownership verification has taken place, make sure that you enable the Federation by turning the button next to Federation not enabled to on.
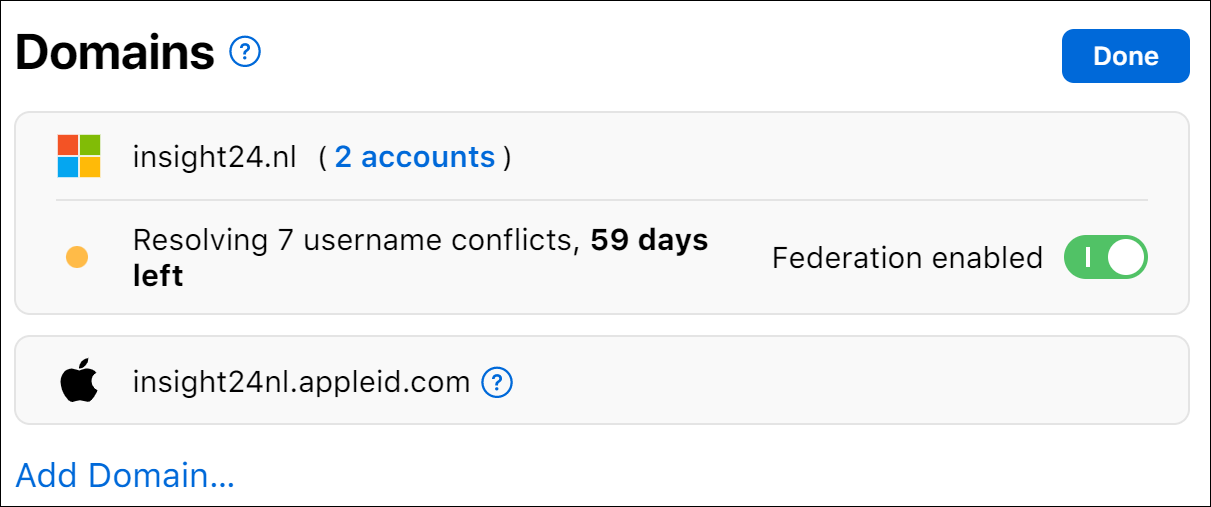
When federation is enabled, while there are still username conflicts, any username synchronized which has a conflict will not be added to ABM.
Username Conflicts
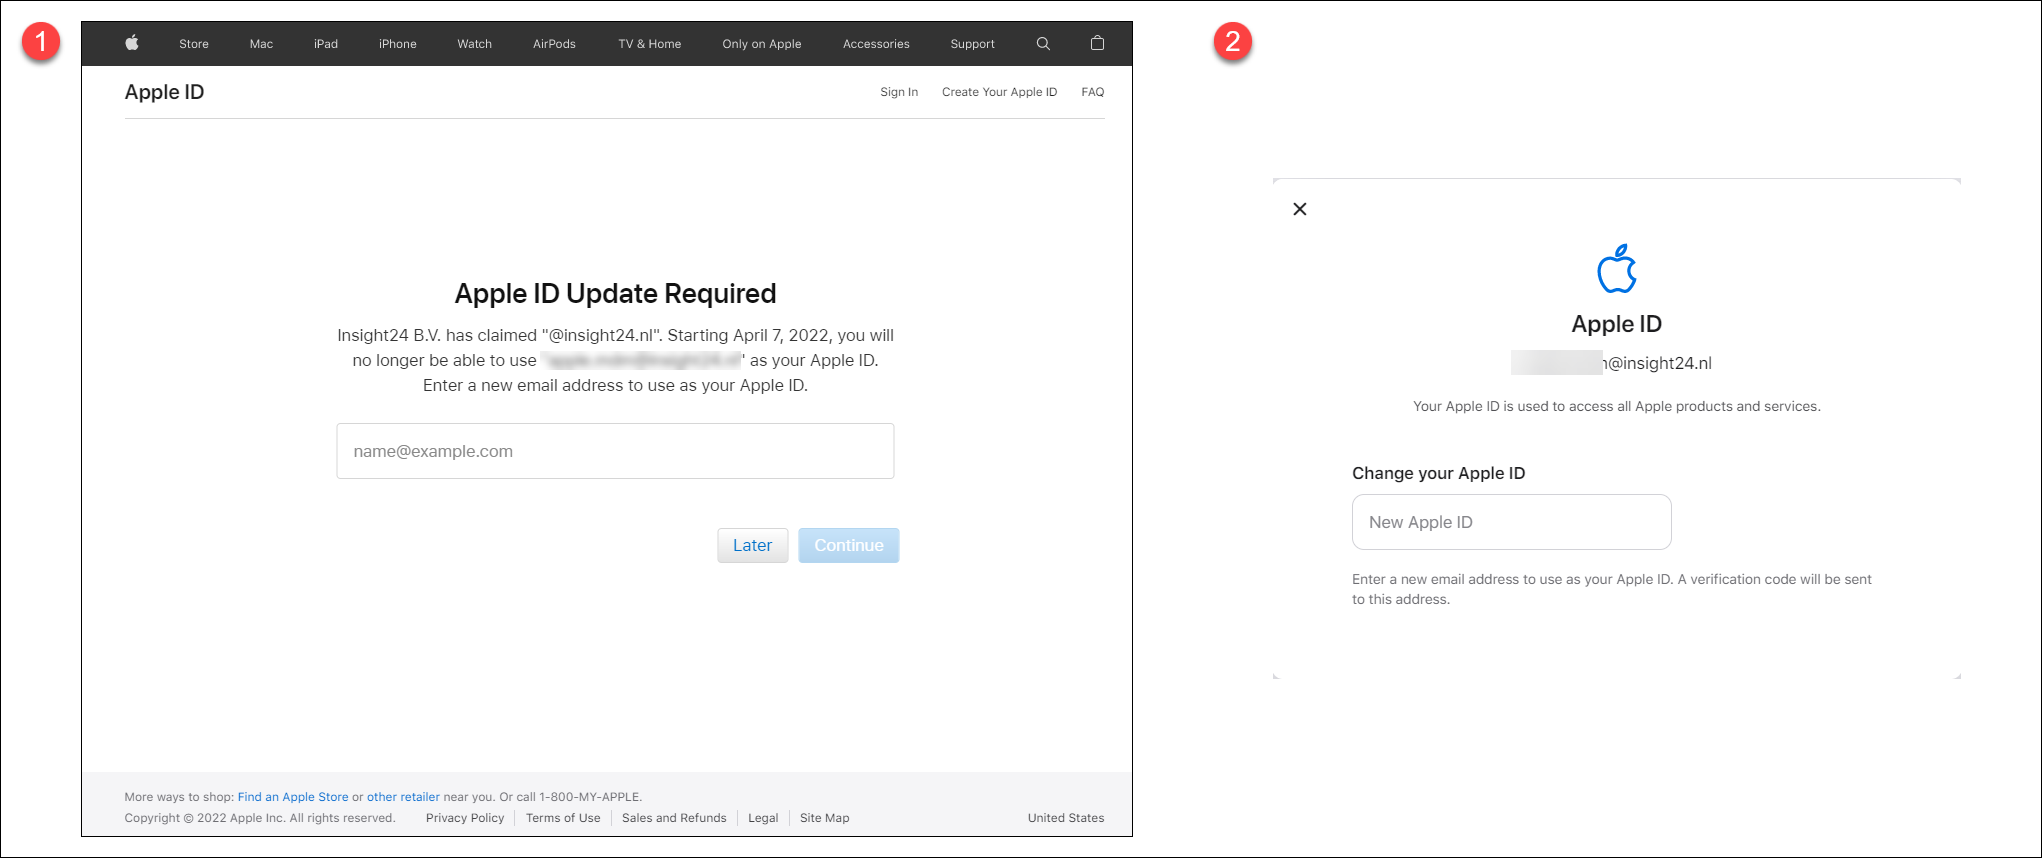
Apple IDs which have a conflict, will receive an email from Apple explaining that the Apple ID must be updated.
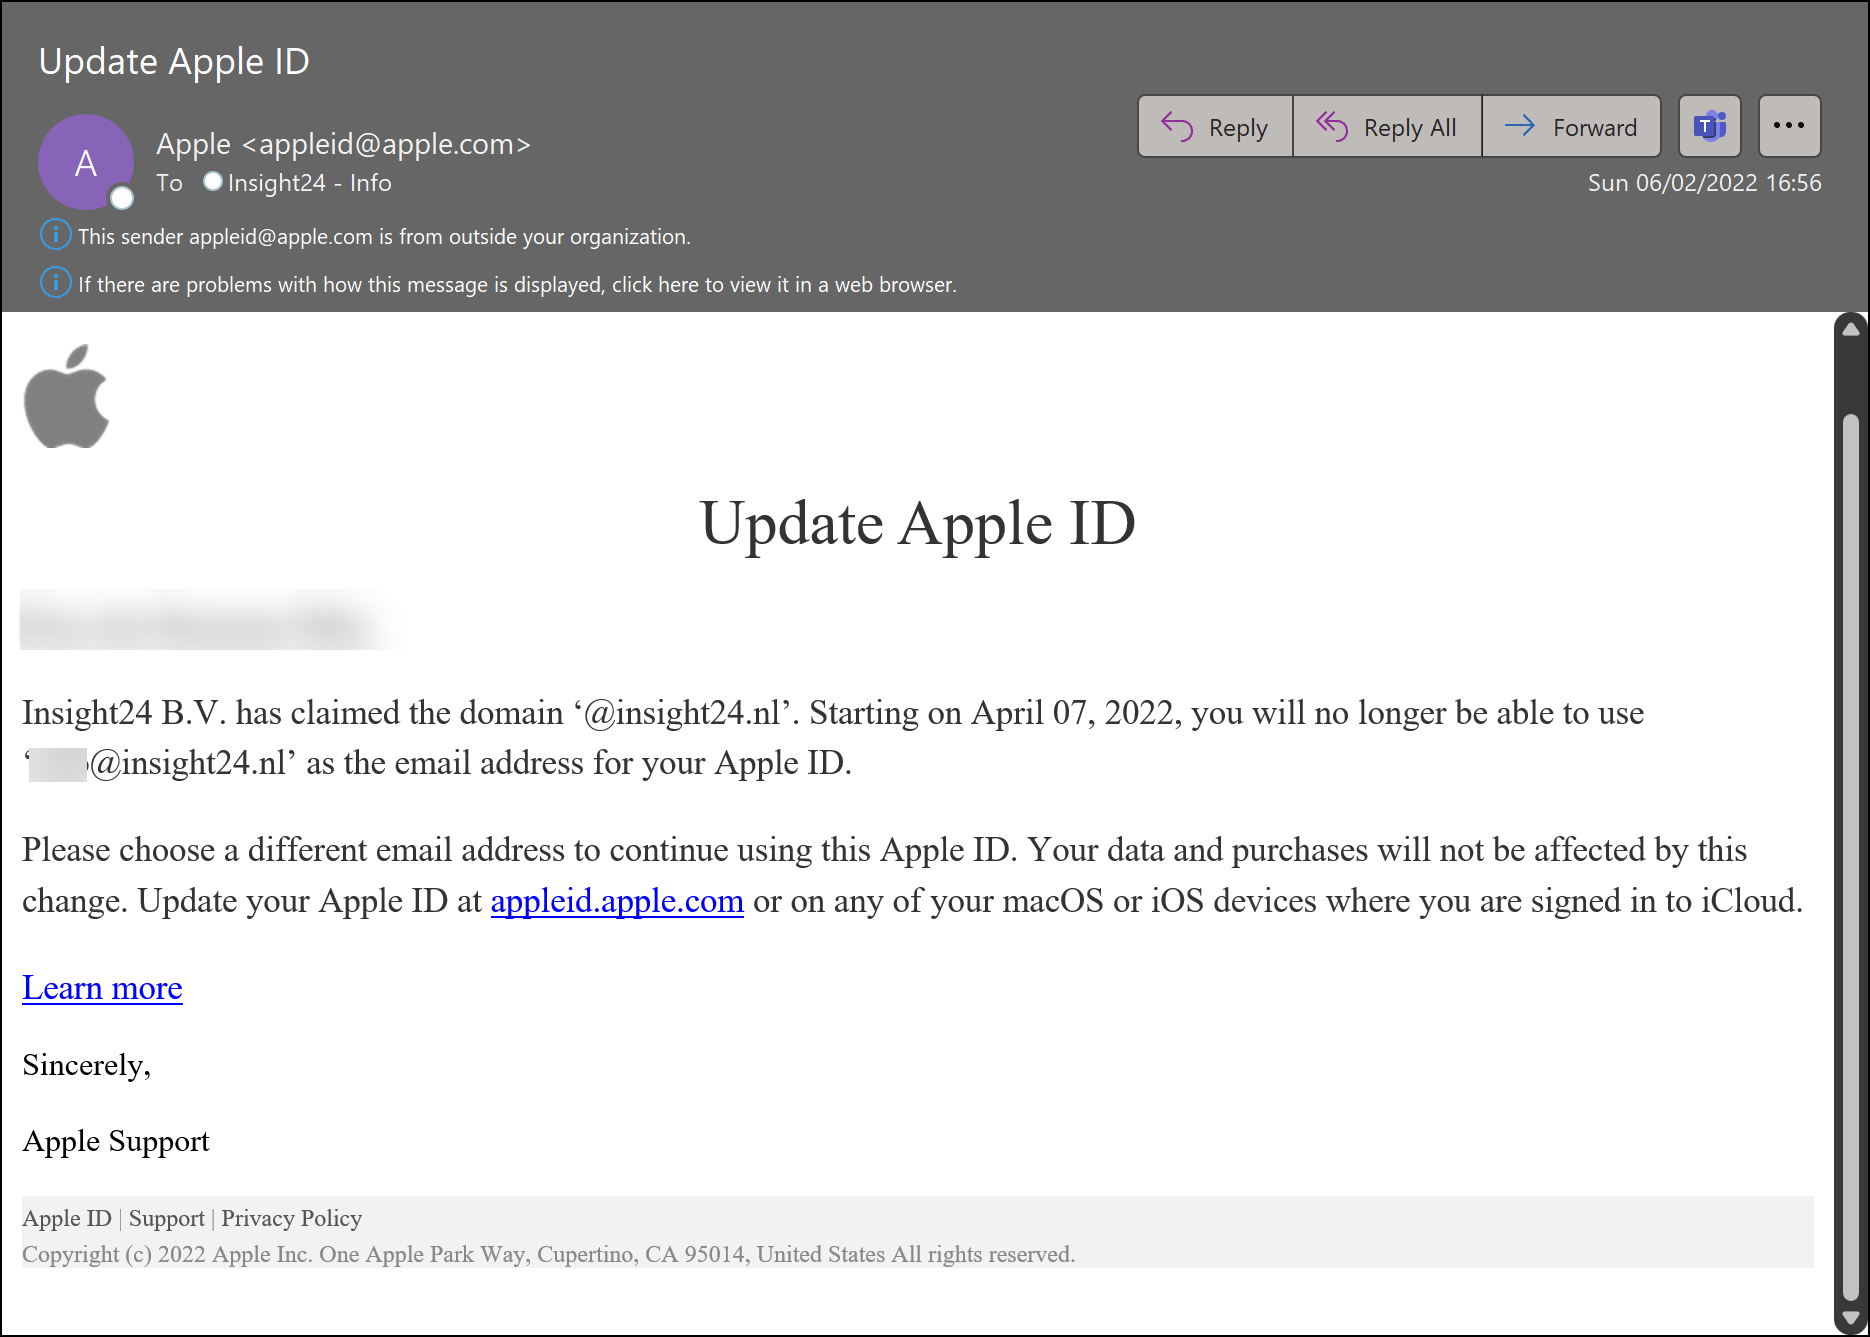
Once the user signs-in on the Apple ID website, he/she will be presented with the following screens which allow the Apple ID to be changed.
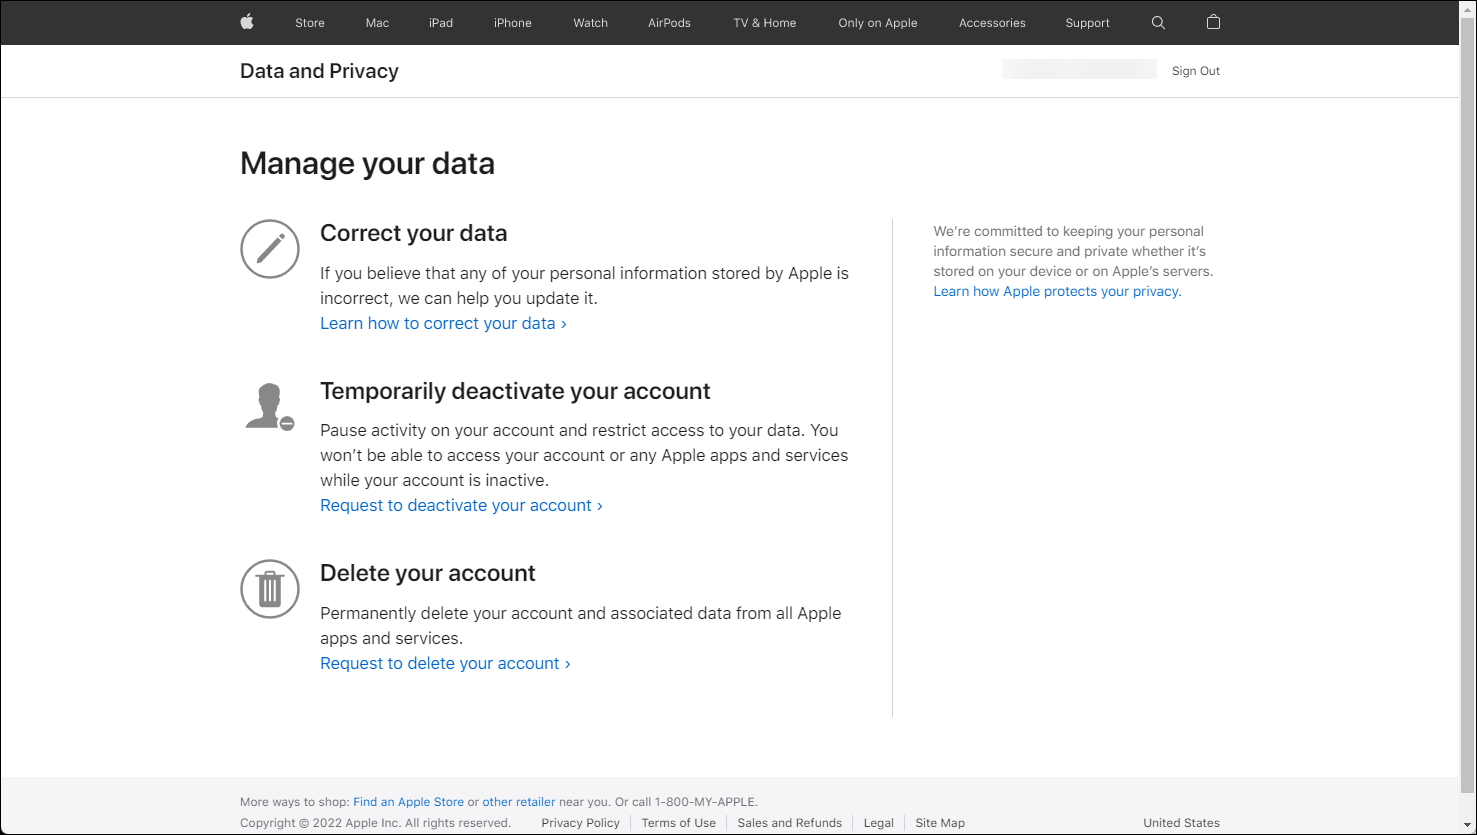
Your users can also choose to delete their account instead, in order to do so, they need to go to the following URL: https://privacy.apple.com/account where under Manage your data the option to Delete your account is available.
Configure Account Synchronization using SCIM
In order to synchronize your Azure AD account to ABM, you can configure System for Cross-domain Identity Management (SCIM), which is supported by Azure AD.
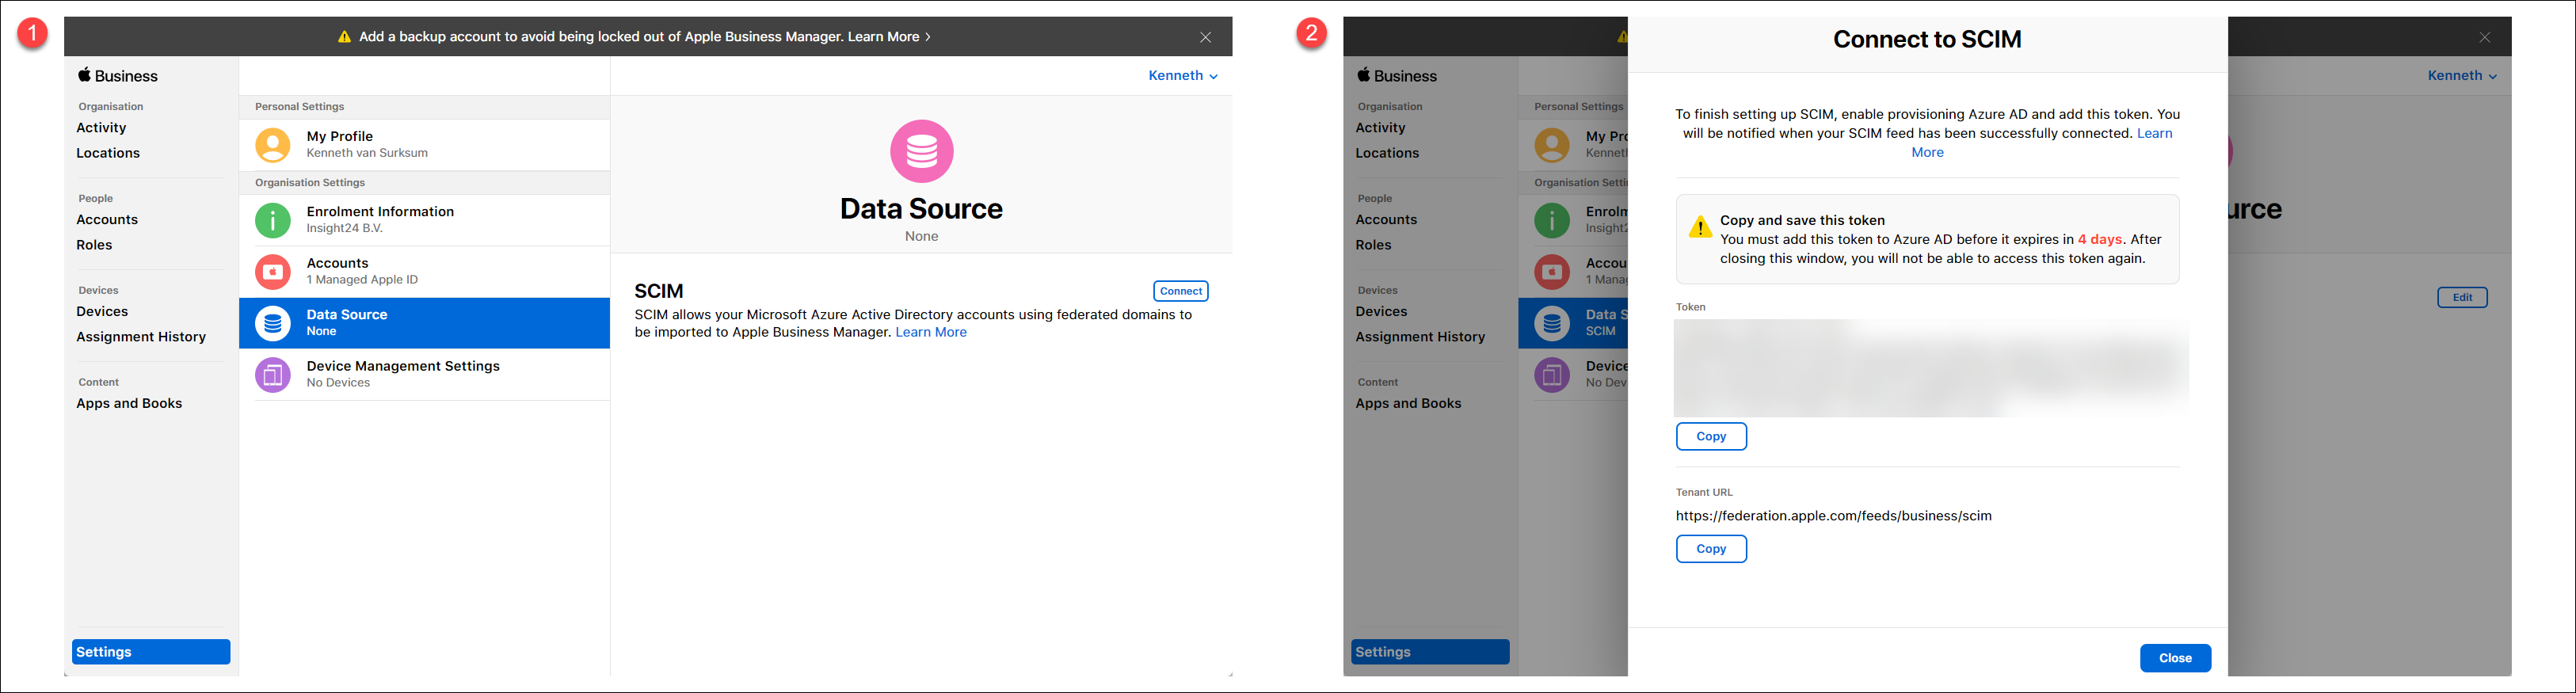
You can configure SCIM from the Data Source section by clicking on the “Connect” button. This will generate a token en URL which you need to configure the “Provisioning” section in the Azure AD Enterprise Application.
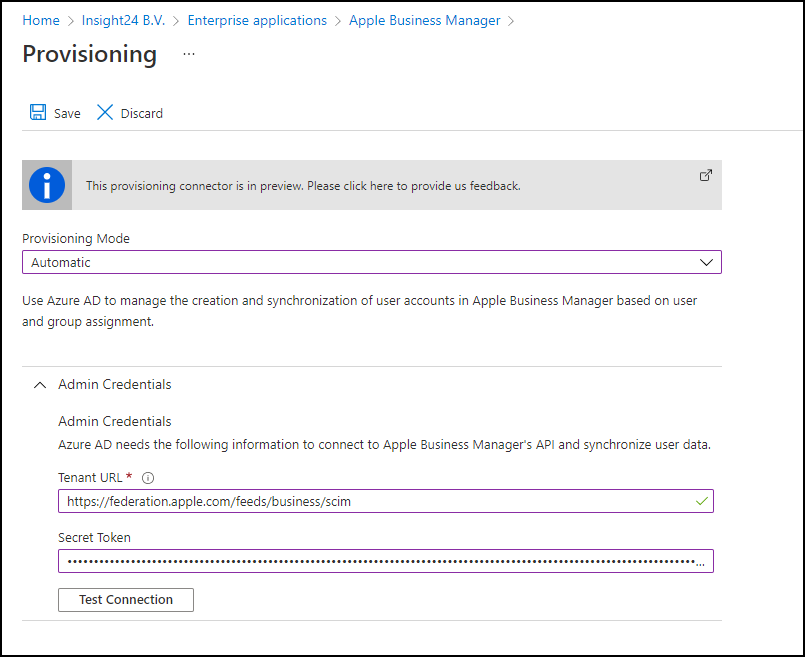
From the Apple Business Manager Enterprise Application in Azure AD, click on the Provisioning link, click on “Get Started” and set the provisioning mode to “Automatic”. Here you can provide the earlier generated URL and token and test the connection.
On the Enterprise Application you can configure whether you only want assigned accounts (members of Users and Groups) or all users to be synchronized to ABM. By default only the members of Users and Groups will be synced, if you want to change this you can Edit the Provisioning settings. Make sure that if you add a group, to the users and Groups that group nesting is not used, since that is not supported.
Once configured an initial sync will be done, synchronization will be enabled every 40 minutes, so if you use a group, it can take up to 40 minutes for the Azure AD account to be added to ABM.
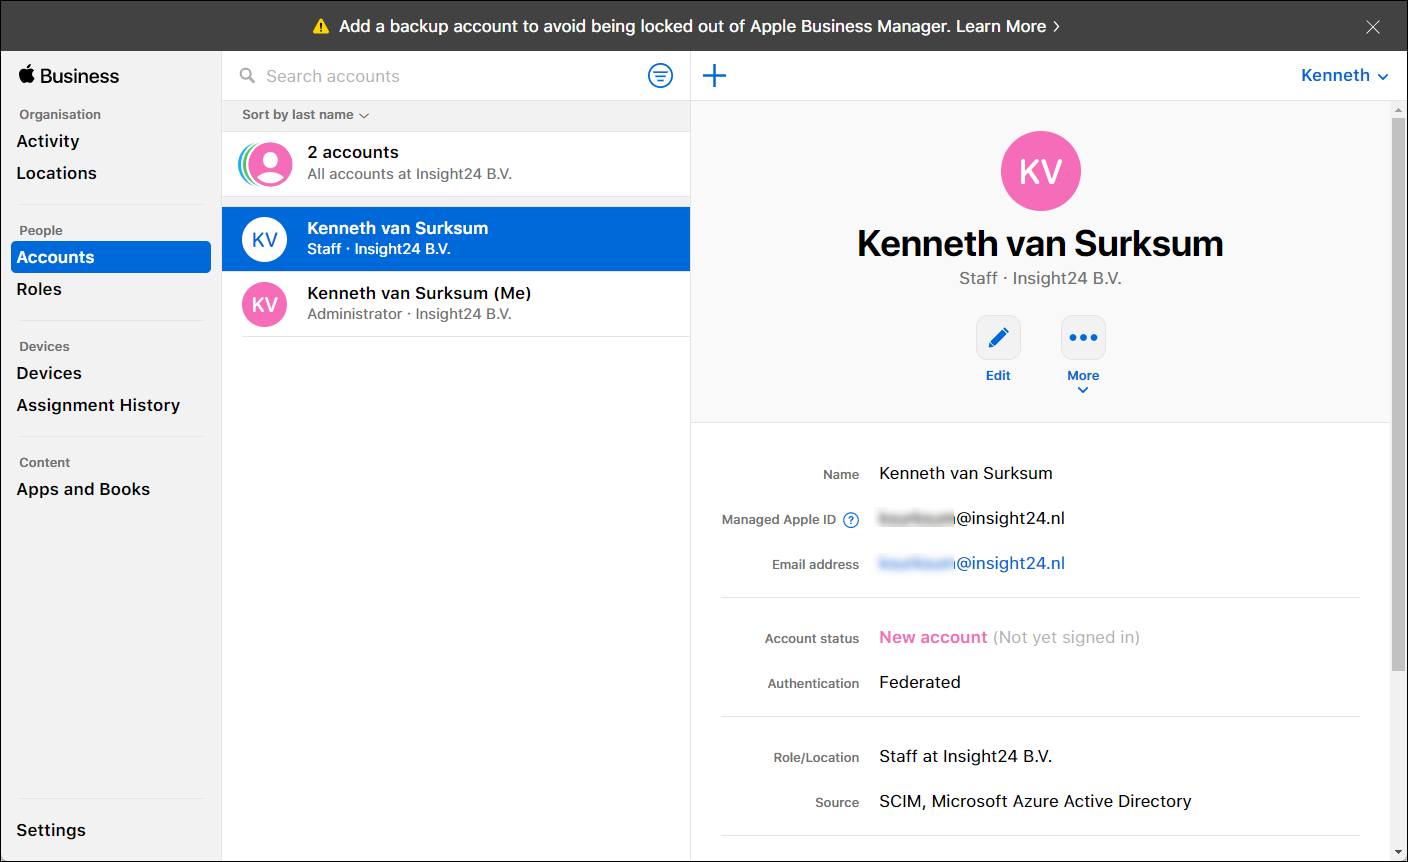
The result will be that after synchronization, you will see new accounts being added to ABM. In the figure below you can see that the source of this account is SCIM/Azure Active Directory. That the account is new, and hasn’t signed in yet.
Keep in mind, that accounts that still have username conflicts will not be created in ABM, so even though they are included in the scope from the Azure AD side, you have to wait to either the users change their Apple ID, or for the grace period to expire before those users can be provisioned into ABM.
Conclusion
Setting up Apple Business Manager (ABM) is a process which requires careful planning and not something which you can finish in a short timeframe. Some steps in the process can take some time to complete, so if you want to use the ABM functionality make sure that you plan accordantly.
I hope this article, can help you if you want to configure ABM for your own organization. I hope I succeeded in giving a good idea of what you can expect when you do so.
In a next article I will go through integrating ABM with Microsoft Endpoint Manager/Intune, so that we can integrate the ABM functionality into our Endpoint Manager environment.
References
Apple Business Manager User Guide – https://support.apple.com/en-gb/guide/apple-business-manager/welcome/web
Introduction to federated authentication with Apple Business Manager – https://support.apple.com/en-gb/guide/apple-business-manager/axmb19317543/1/web/1
Review SCIM requirements for Apple Business Manager – https://support.apple.com/en-gb/guide/apple-business-manager/axmd88331cd6/1/web/1
Automatically enroll iOS/iPadOS devices by using Apple’s Automated Device Enrollment – https://docs.microsoft.com/en-us/mem/intune/enrollment/device-enrollment-program-enroll-ios
Many thanks for your detailed instructions.